Technique FLASH29:Setting the label property for form components
About this Technique
This technique is not referenced from any Understanding document.
This technique applies to content implemented in Adobe Flash.
Description
The objective of this technique is to explicitly associate a form
component with its label text by setting the component's label property.
Setting this property will visually place a label next to the component,
and exposes the label text to assistive technology.
Components that support the label property are:
For other components, the label text has to placed adjacent to the form component manually. For these components, the label text can be associated with the form component using one of these approaches:
Examples
In order for these form controls to be accessible to assistive technology, the following lines of code will have to be added once to the movie's script:
When the Button component is used:
import fl.accessibility.ButtonAccImpl; ButtonAccImpl.enableAccessibility();
When the RadioButton component is used:
import fl.accessibility.RadioButtonAccImpl; RadioButtonAccImpl.enableAccessibility();
When the CheckBox component is used:
import fl.accessibility.CheckBoxAccImpl; CheckBoxAccImpl.enableAccessibility();
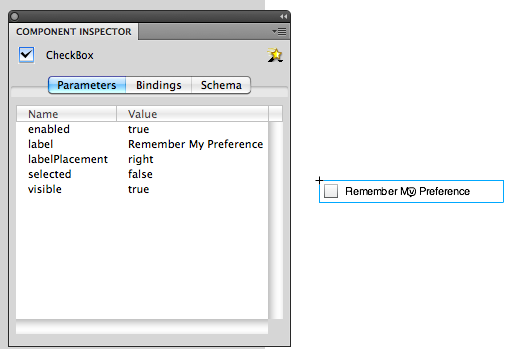
Example 1: Setting the label using the Component Inspector panel
- Add the Button, CheckBox or RadioButton component to the movie by dragging it on the stage from the 'Components' panel.
- With the component selected, open the 'Component Inspector' panel by selecting it in the 'Window' menu or using the Shift + F7 shortcut.
- In the Component Inspector, under the 'Parameters' tab, enter the label text for the 'label' parameter.
The screenshot below illustrates this technique.

Example 2: Setting the label on a Button, CheckBox and RadioButton component using ActionScript 3.0
import fl.accessibility.ButtonAccImpl
import fl.accessibility.CheckBoxAccImpl
import fl.accessibility.RadioButtonAccImpl
import fl.controls.Button;
import fl.controls.CheckBox;
import fl.controls.RadioButton;

ButtonAccImpl.enableAccessibility();
var myButton: Button = new Button();
myButton.label = "Submit Details";
myButton.x = 10;
myButton.y = 10
addChild(myButton);

CheckBoxAccImpl.enableAccessibility();
var myCheckBox: CheckBox = new CheckBox();
myCheckBox.label = "notify me";
myCheckBox.x = 10;
myCheckBox.y = 40
addChild(myCheckBox);

RadioButtonAccImpl.enableAccessibility();
var myRadioButton: RadioButton = new RadioButton();
myRadioButton.label = "Male";
myRadioButton.x = 10;
myRadioButton.y = 60;
addChild(myRadioButton);
This technique is demonstrated in the working example of Setting the label on a Button, CheckBox and RadioButton component using ActionScript 3.0. The source of Setting the label on a Button, CheckBox and RadioButton component using ActionScript 3.0 is available.
Tests
Procedure
When the Button, CheckBox or RadioButton components are used:
- confirm that labels describing the purpose of the button have
been provided through the component's
labelproperty.
Expected Results
- #1 is true