Basics of Japanese Composition
Characters and the Principles of Setting them for Japanese Composition
Characters Used for Japanese Composition
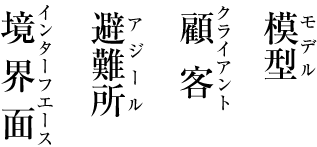
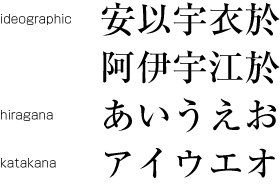
Japanese letters used for composing Japanese text mainly consist of ideographic (cl-19), hiragana (cl-15) and katakana (cl-16) characters (see ).
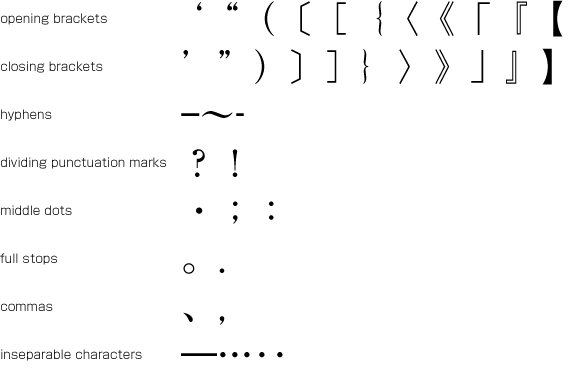
In addition to ideographic (cl-19), hiragana (cl-15) and katakana (cl-16) characters, various punctuation marks (see ) as well as Western characters (cl-27), such as European numerals, Latin letters and/or Greek letters, may be used in Japanese text. In this document these characters are classified into character classes, for which explanations are given describing their behavior in type-setting.
Kanji, Hiragana and Katakana
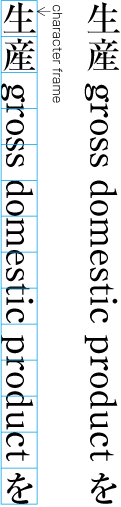
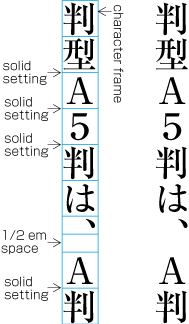
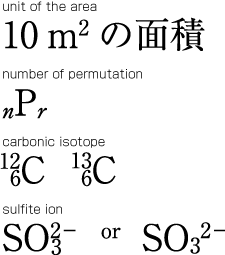
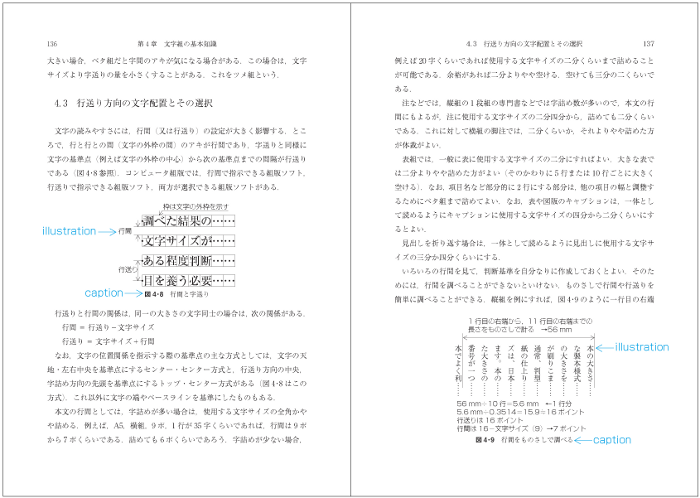
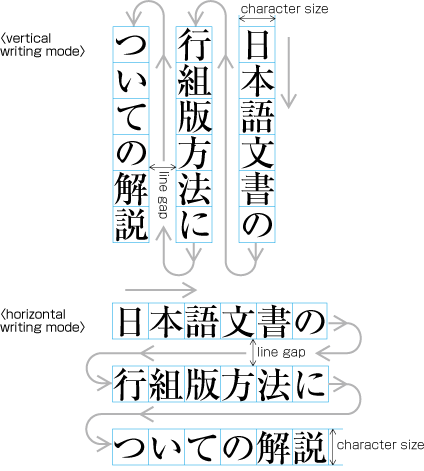
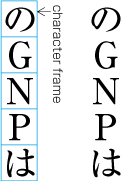
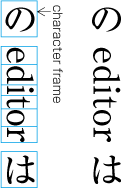
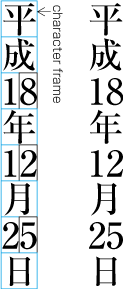
Ideographic (cl-19), hiragana (cl-15) and katakana (cl-16) characters are the same size, and have square character frames of equal dimensions. Aligned with the vertical and horizontal center of the character frame, there is a smaller box called the letter face, which contains the actual symbol. Character size is measured by the size of the character frame (see ). "Character advance" is a term used to describe the advance width of the character frame of a character. By definition, it is equal to the "width" of a character in horizontal writing mode, whereas it is the height of a character in vertical writing mode (see ).
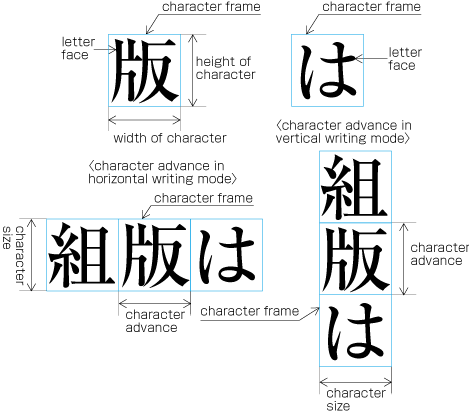
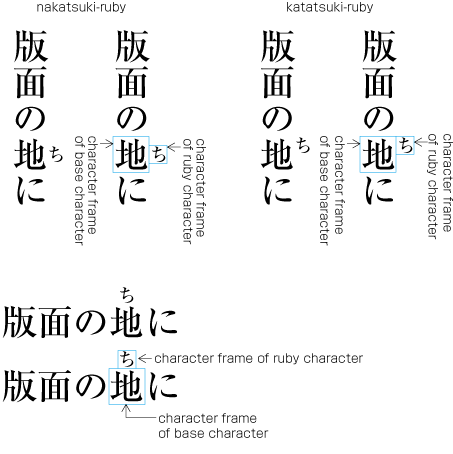
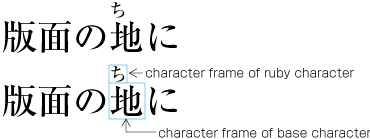
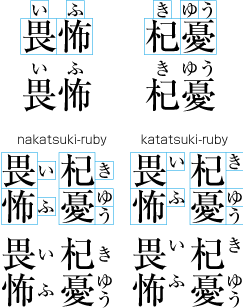
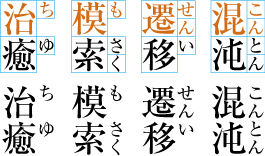
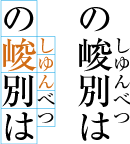
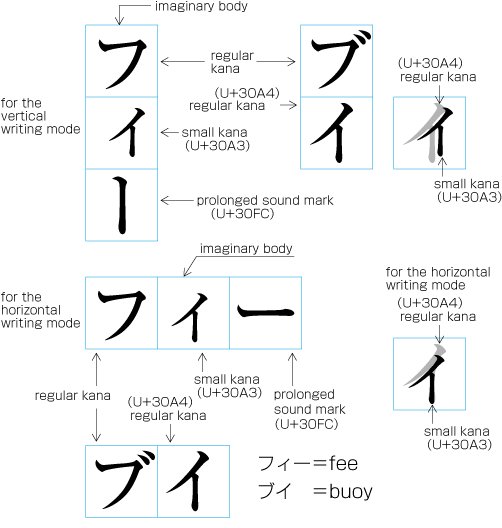
In vertical writing mode, the letter face of small kana (cl-11) characters (ぁぃぅァィゥ etc.) is placed at the vertical center and to the right of the horizontal center of the character frame; in horizontal writing mode, it is placed at the horizontal center and below the vertical center (see ). Also there are punctuation marks with letter faces that are not placed at the vertical and horizontal center of the character frame.
Principles of Arrangement of Kanji and Kana Characters
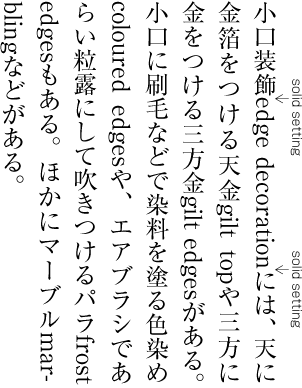
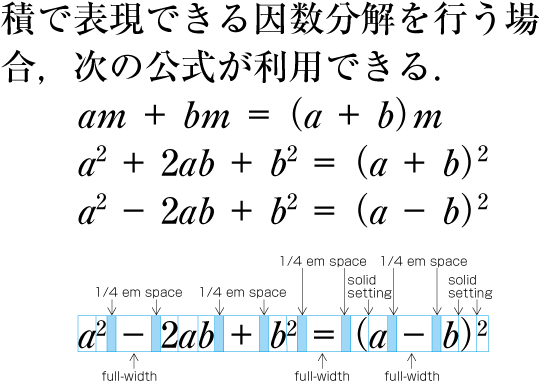
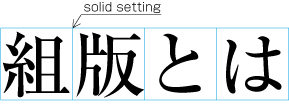
In principle, when composing a line with ideographic (cl-19), hiragana (cl-15) and katakana (cl-16) characters no extra space appears between their character frame. This is called solid setting (see ).
In the letterpress printing era ideographic (cl-19), hiragana (cl-15) and katakana (cl-16) characters were designed so that they were easy to read in solid setting, regardless of text direction. However, unlike the letterpress printing era, when several sizes of the original pattern of a letter were required to create matrices, in today's digital era the same original pattern is used for any size simply by enlargement or reduction. Because of this, it might be necessary to adjust the inter-character space when composing lines at large character sizes. When composing lines at small character sizes, hinting data is used to ensure that the width of the strokes that make up a character look correct.
Depending on the context, there are several setting methods used in addition to solid setting, as shown below.
-
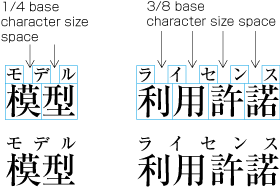
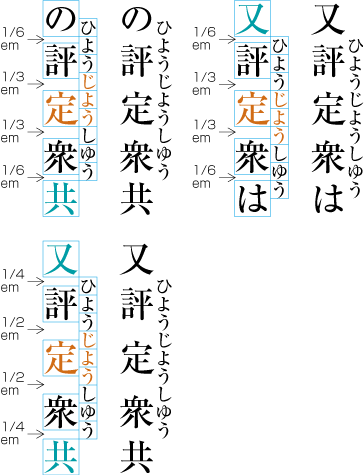
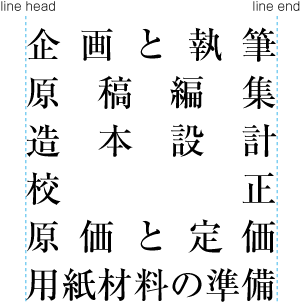
Fixed inter-character spacing: Text set with a fixed size space between each character frame (see ).
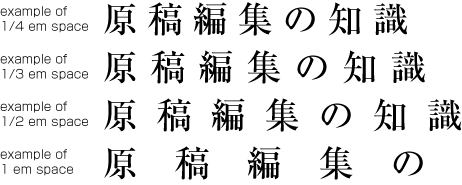
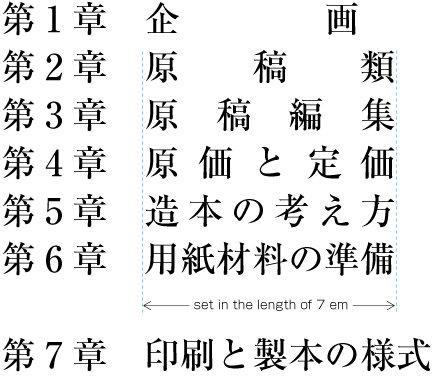
Examples of fixed inter-character spacing in horizontal writing mode. Fixed inter-character spacing is used in books for the following cases: (Fixed inter-character spacing, including also even tsumegumi, is defined in JIS X 4051, sec. 4.18.1 b.)
-
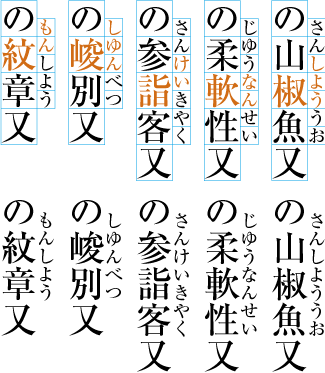
To achieve a balance between running heads with few and with many characters. Fixed inter-character spacing is used for the running heads with few characters. Examples of fixed inter-character spacing for running heads are given in JIS X 4051, annex 5.
-
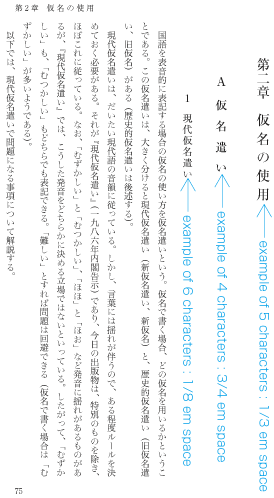
To achieve a balance between headings with few and with many characters. Fixed inter-character spacing is used for the headings with few characters. Examples of fixed inter-character spacing for headings are given in JIS X 4051, annex 6.
-
For captions of illustrations and tables, which only have a few characters. Fixed inter-character spacing is used to balance with the size of the illustration or table.
-
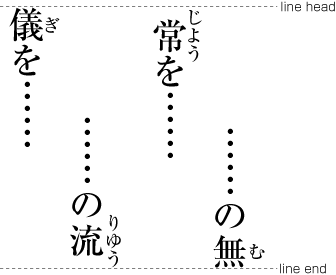
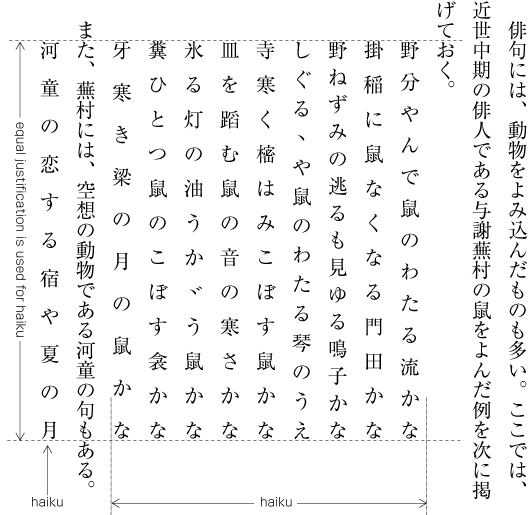
In some cases, fixed inter-character spacing is used for Chinese and Japanese poetry where one line has only a few characters.
-
-
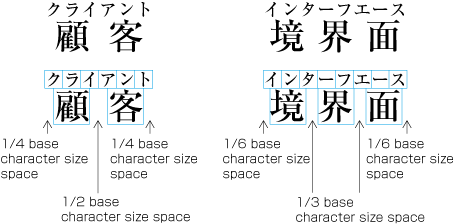
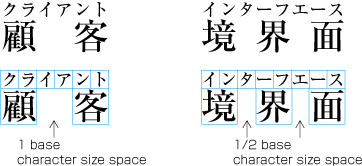
Even inter-character spacing: Text set with equal inter-character spacing between characters on a given line, so that each line is aligned to the same line head and line end (see ).
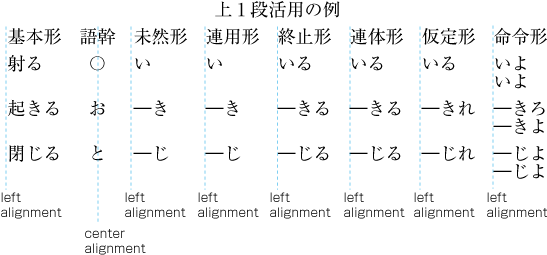
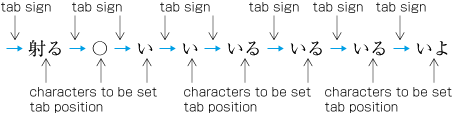
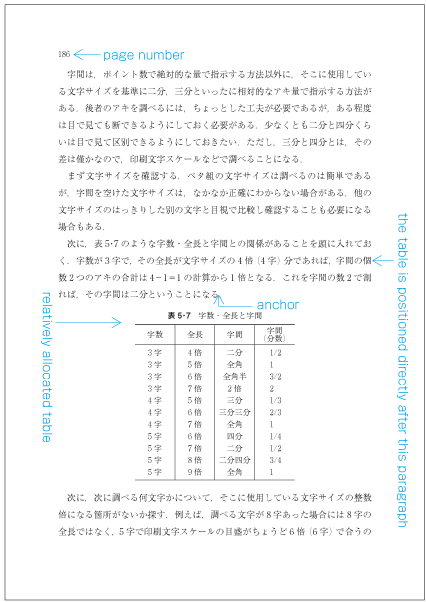
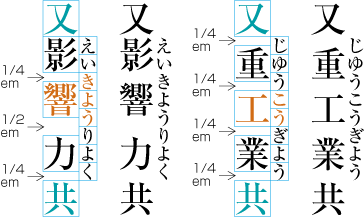
Example of even inter-character space setting in horizontal writing mode. Even inter-character space setting is used in books for unifying the length of table headings with Japanese text (see ). There are also examples (e.g. lists of names) in which parts of a person names receive inter-character spacing. (Even inter-character spacing, including processing of jidori, is defined in JIS X 4051, sec. 4.18.1.)
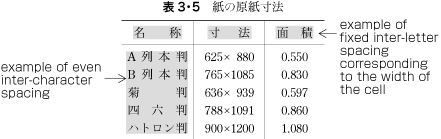
Example of a table with inter-character spacing. -
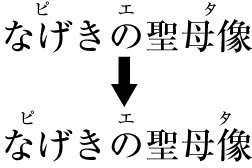
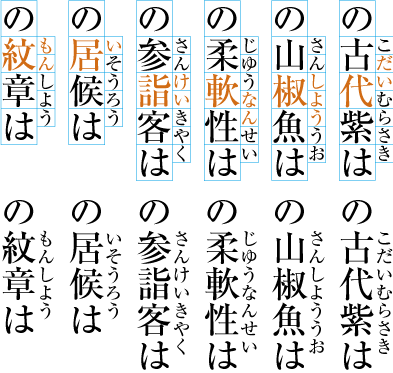
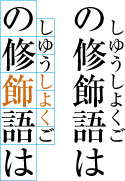
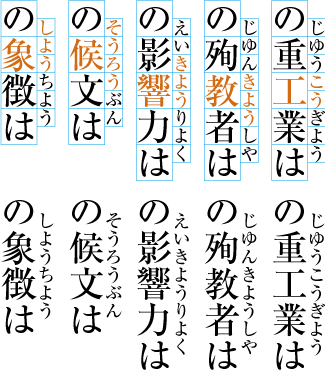
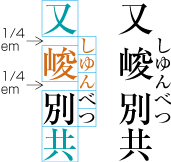
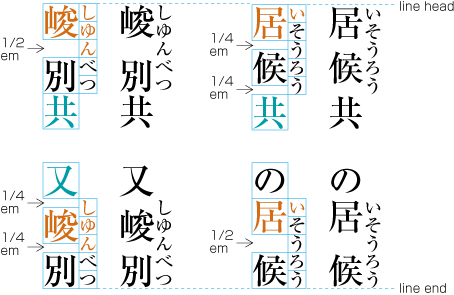
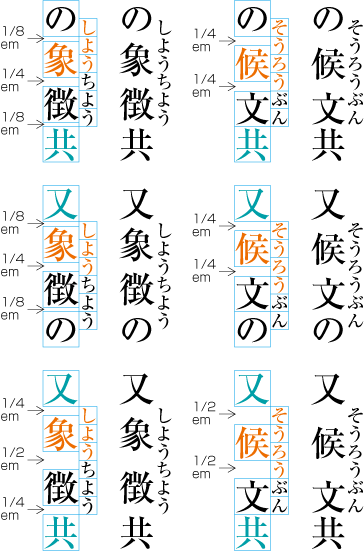
Tsumegumi (kerning / tracking): Text is set with negative inter-character space by arranging characters so that a portion of two character frames overlap each other. This is divided further into two types, depending on the methods used for inter-character space reduction. One method involves reducing by the same amount of inter-character space (even tsumegumi or tracking, see ) and the other involves determining the amount of space to reduce based on the distance between the two letter faces of adjacent characters (face tsumegumi or letter face kerning, see ).

Example of even tsumegumi in horizontal writing mode. (The 1st line is the same text with solid setting, for comparison.) 
Example of face tsumegumi in horizontal writing mode. (The 1st line is the same text with solid setting, for comparison.) In the main text of books, the most reader-friendly approach is to use solid setting. However, if the character size is larger, the distance between characters may become unbalanced, and tsumegumi will be applied. For example, there are books where tsumegumi is used with headings set in large character sizes. These methods are rarely used in books, since ease of reading is very important, but in magazines or advertisements there are many more examples of tsumegumi. Magazines tend to use type to differentiate themselves from others, and so devices like this are sometimes used for that purpose.
Page Formats for Japanese Documents
Specification of Page Formats
The page format of a Japanese document is specified by:
-
Firstly, preparing a template of the page format, which determines the basic appearance of pages of the document;
-
Then, specifying the details of actual page elements based on the templates.
Basic Templates of Page Formats
Generally, books use only one template for page format, whereas magazines often use several templates.
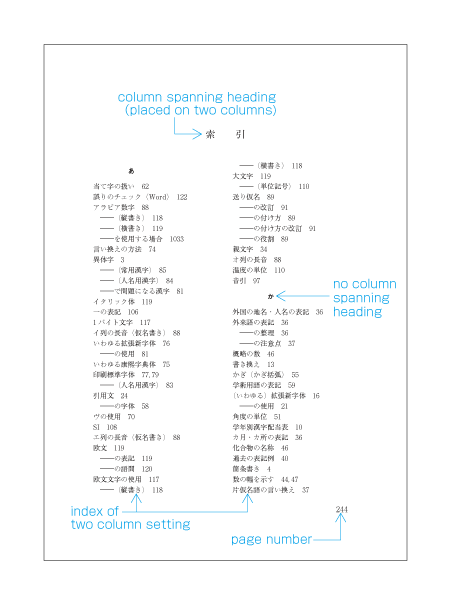
Although in books, as will be mentioned in c of , there tends to be one template for the page format, the basic pattern is typically adapted. For example, the table of contents may contain small modifications. Furthermore, there are many examples of indexes with a different page format than the basic page format, and vertically set books often have indexes in horizontal writing mode and sometimes multiple columns. This still holds true where the goal is to make the size of the hanmen for indexes close to the size of hanmen in the basic page format.
Magazines gather articles of different kinds. Often the page format will differ depending on the content of the article. For example, one part may have 9 point character size and 3 columns, and another part 8 point character size and 4 columns.
Elements of Page Formats
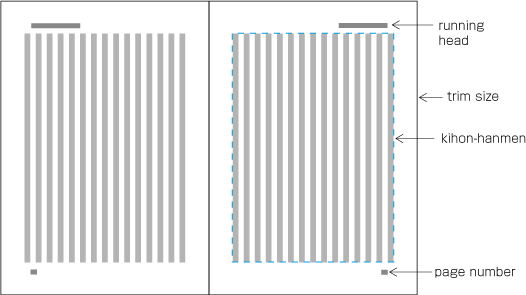
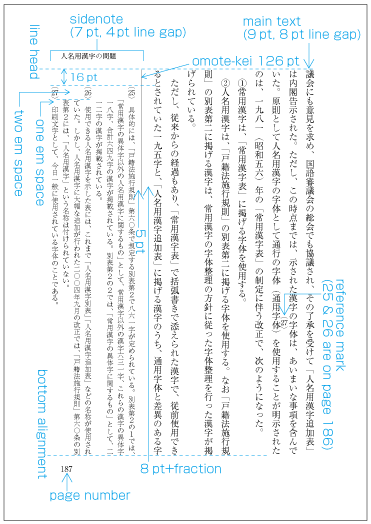
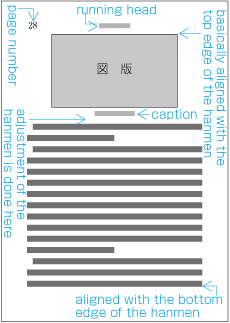
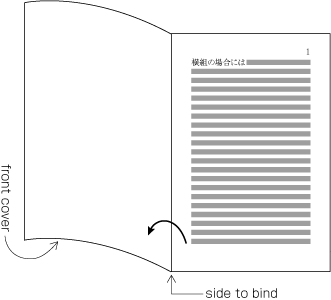
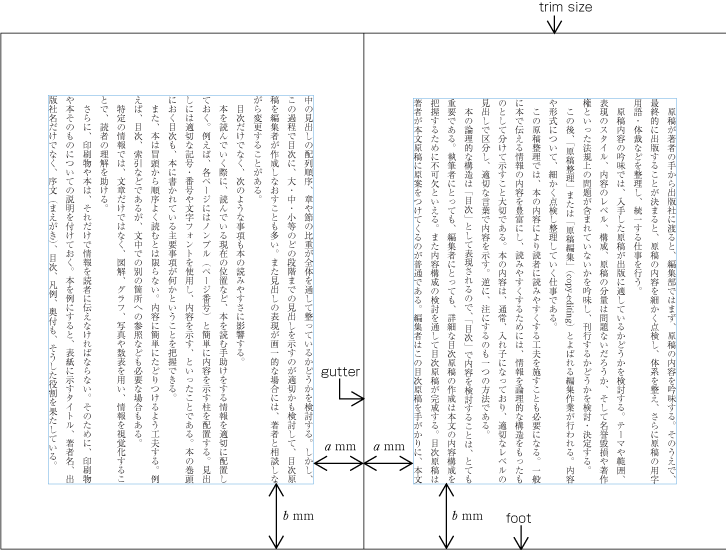
The following are the basic elements of a page format. illustrates an example of a page format in vertical writing mode).
-
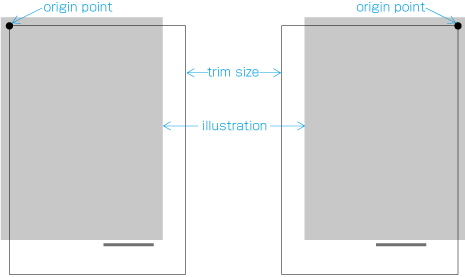
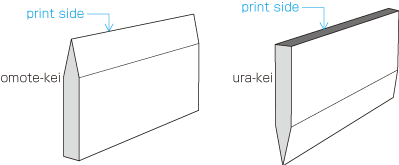
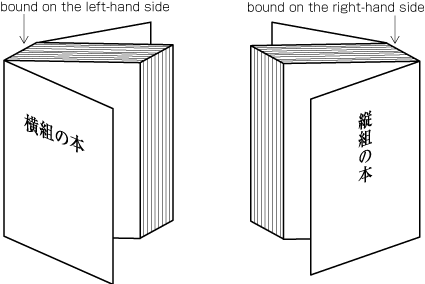
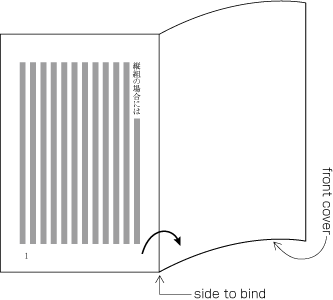
Trim size and binding side (vertically set Japanese documents are bound on the right-hand side, and horizontally set documents are bound on the left-hand side. See .)
-
Principal text direction (vertical writing mode or horizontal writing mode).
-
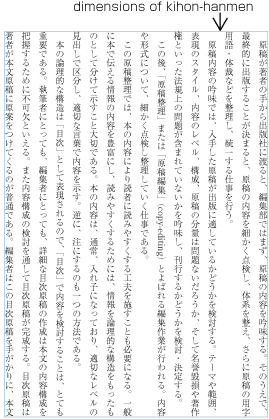
Appearance of the kihon-hanmen and its position relative to the trim size.
-
Appearance of running heads and page numbers, and their positions relative to the trim size and kihon-hanmen.
Elements of Kihon-hanmen
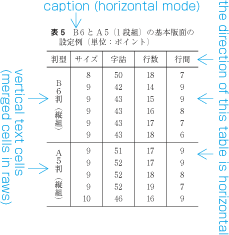
The kihon-hanmen is the hanmen style designed as the basis of a book. The following are the basic elements of the kihon-hanmen (see ).
-
Character size and typeface name
-
Text direction (vertical writing mode or horizontal writing mode)
-
Number of columns and column gap when using multi-column format
-
Number of lines per page (number of lines per column when using multi-column format)
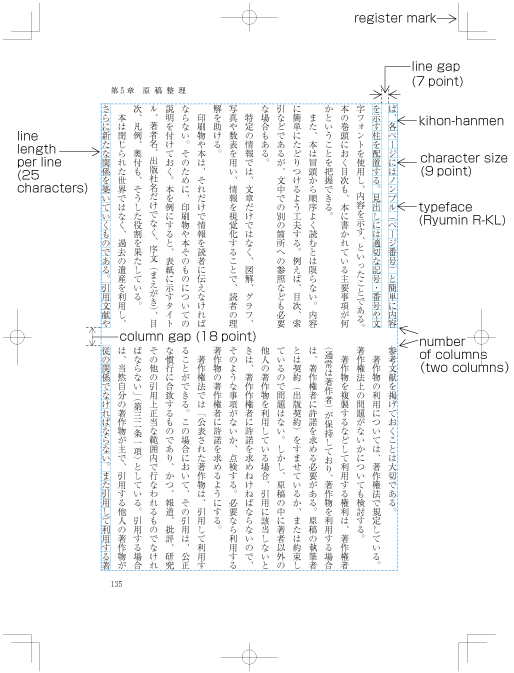
To understand the characteristics of Japanese composition, it is important to understand how the various elements of the kihon-hanmen are applied to a real page. The details will be explained in 2.5 Page wise Arrangement of Kihon-hanmen Elements.
The normative definition of kihon-hanmen is provided in JIS X 4051, sec. 7.5.
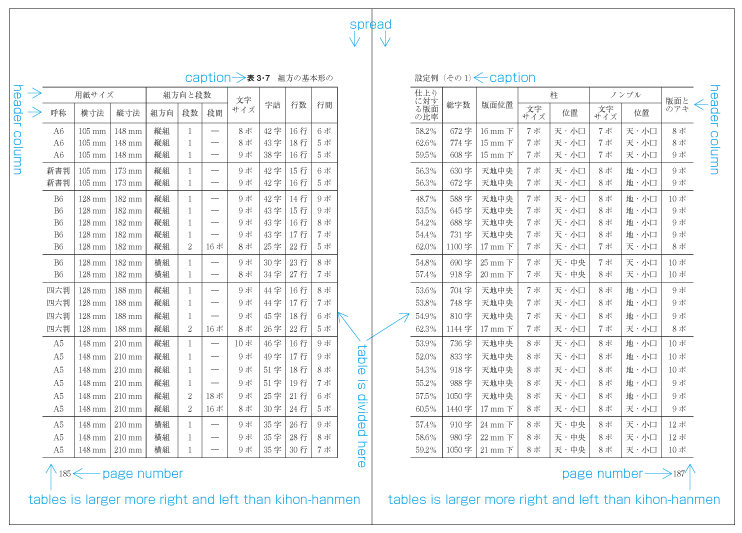
Format examples (including running heads and page numbers) and composition examples for kihon-hanmen in different trim sizes are available in JIS X 4051, annexes 3 and 4.
Depending on the application, character sizes can be specified in multiple ways. For books, character size is mainly specified using points or Q/q. Points are used for letterpress printing. In JIS Z 8305 (size units of printing type), one point is determined to be 0.3514mm. This is the size that is usually used. However, some commonly used applications adopt one point as 1/72 inch, ca. 0.3528mm. Q was used for photo typesetting. One Q is 0.25mm. It is very difficult to unify the unit sizes for character size specifications, because actual users prefer the unit to which they are accustomed. In some companies, multiple types of unit are used together.
Kihon-hanmen and Examples of Real Page Format
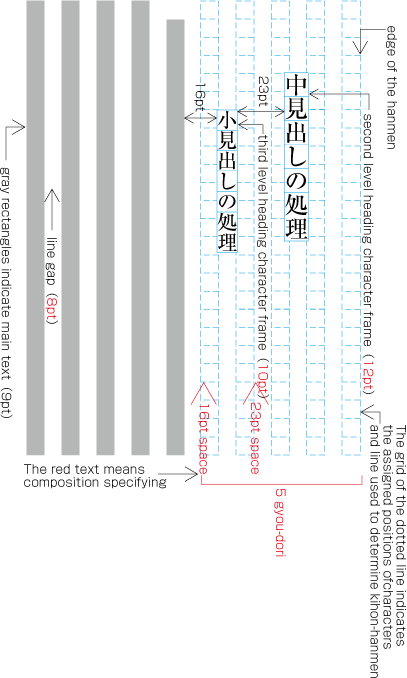
Below are several examples of how the basic page format is created, and how then various elements are placed on a real text page. (This and other aspects of how the various elements of the kihon-hanmen are arranged on each page are explained in .)
-
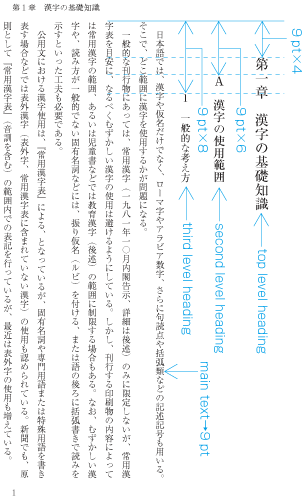
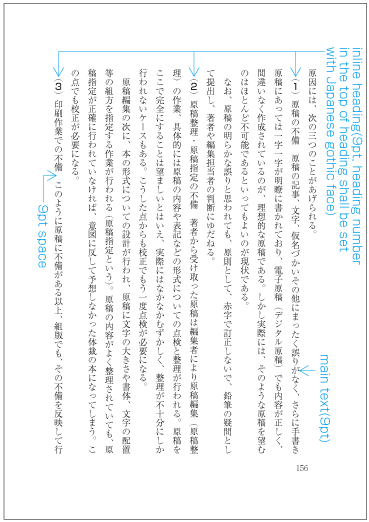
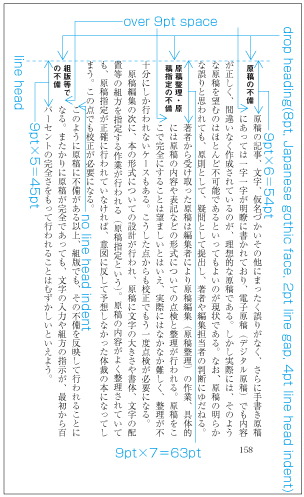
Realm and position of headings
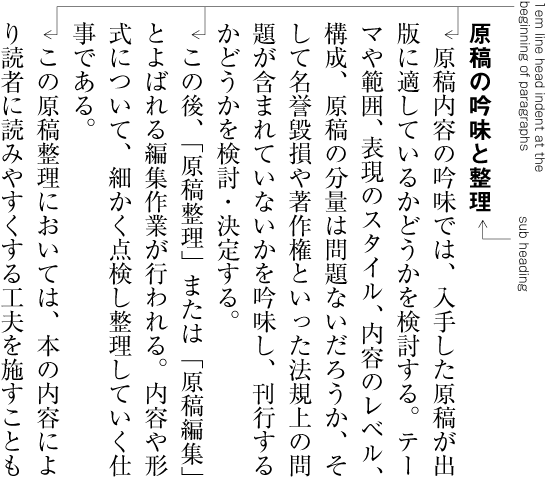
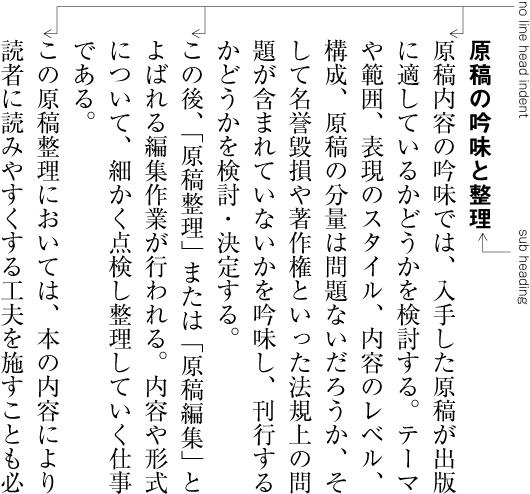
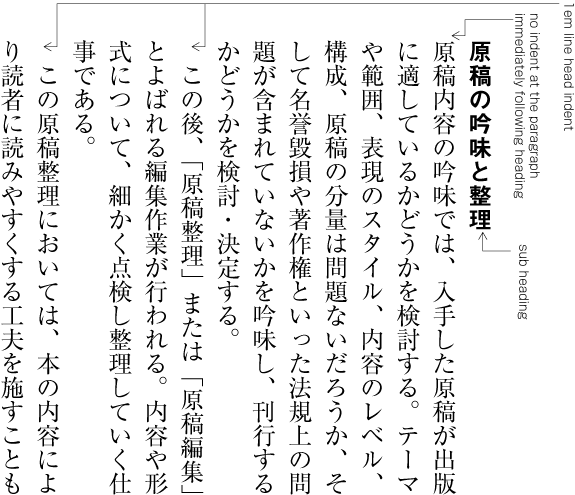
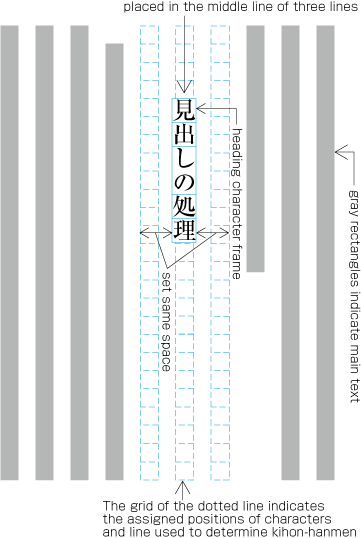
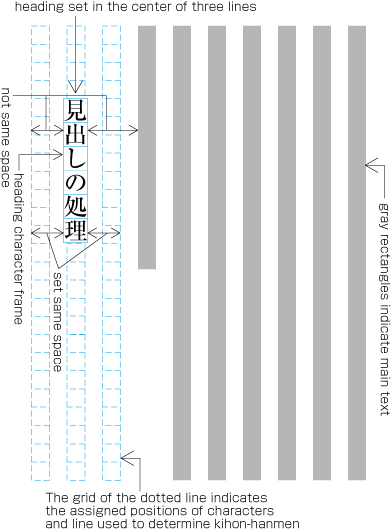
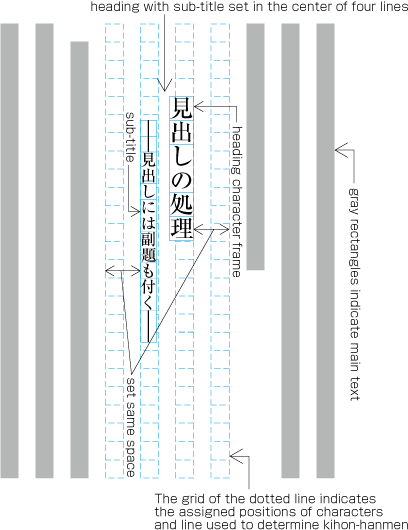
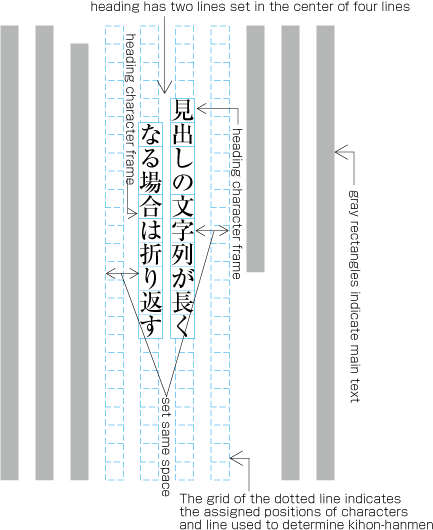
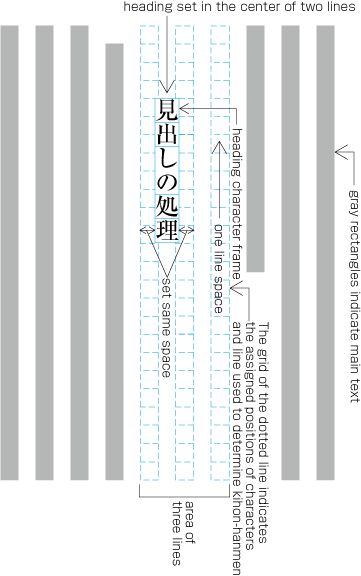
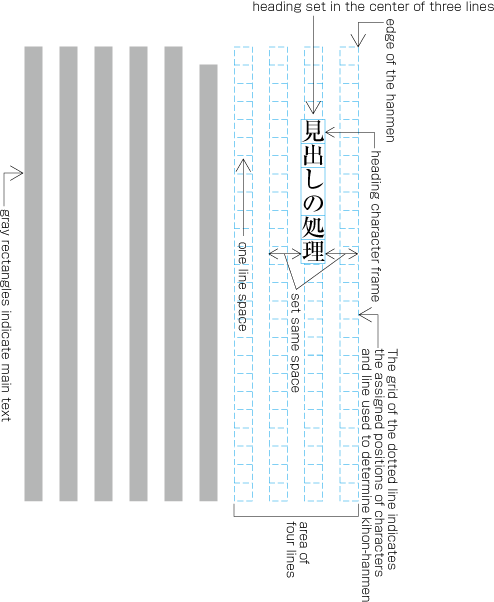
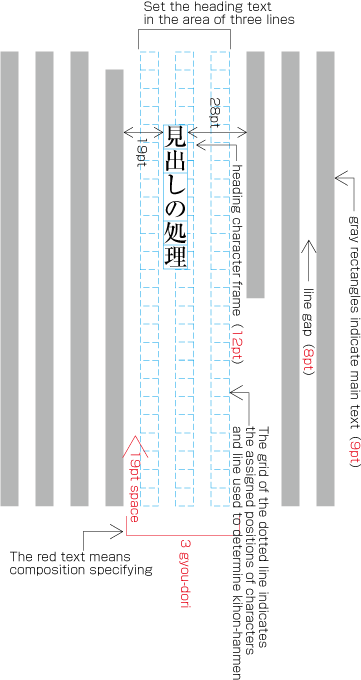
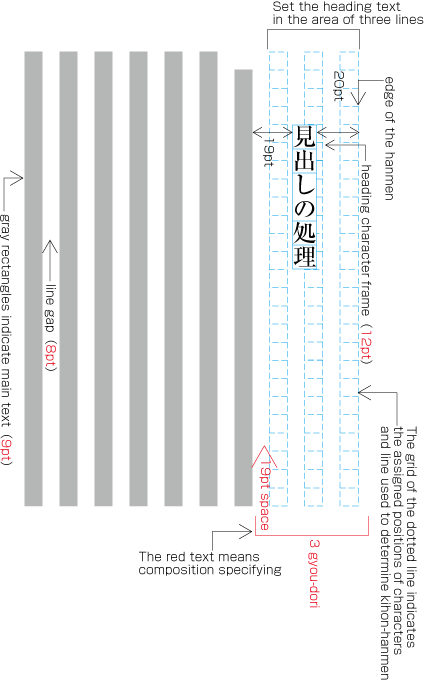
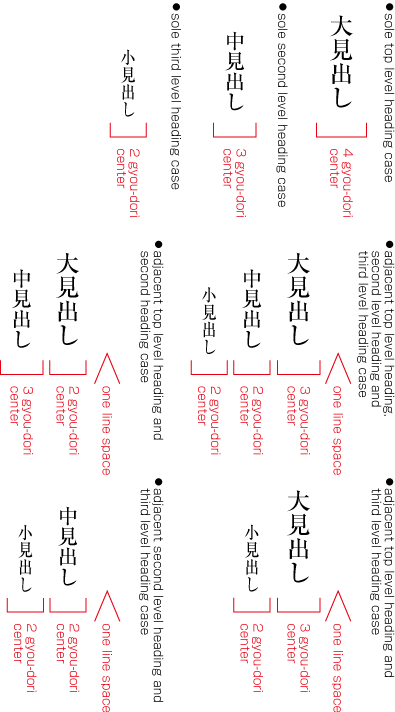
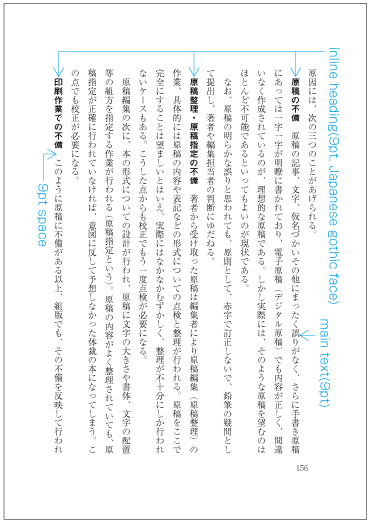
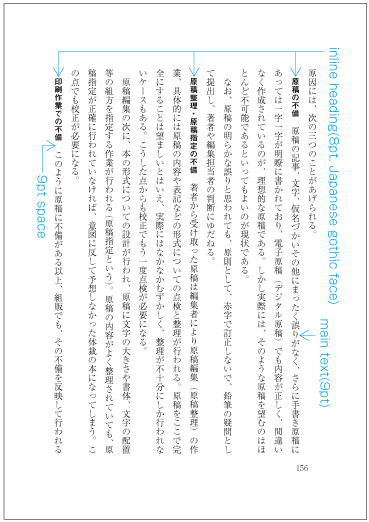
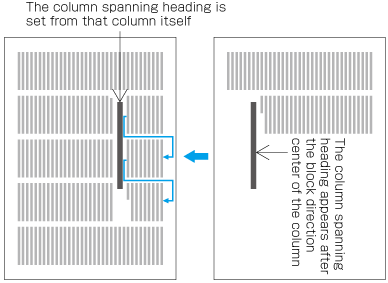
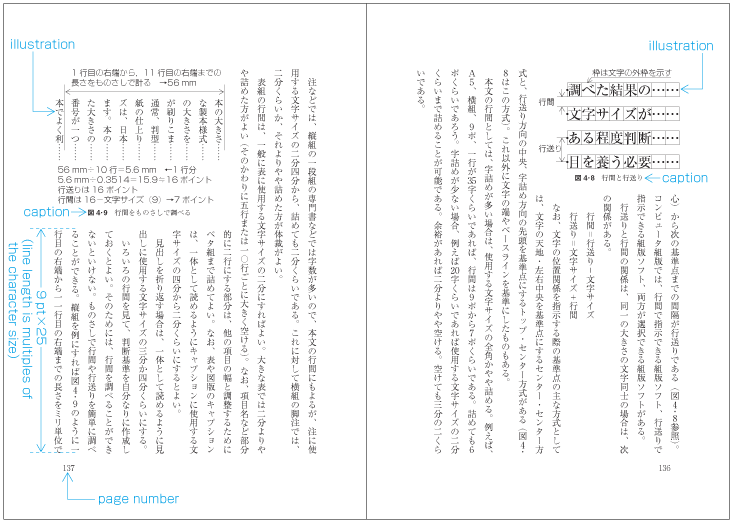
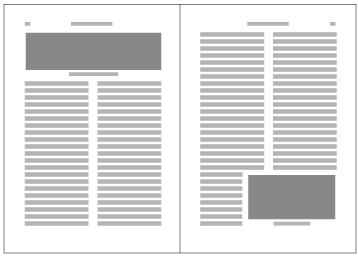
To set a heading, first establish a rectangular space based on a number of lines in the kihon-hanmen. For example, a '3 line space' means (3 * the size of the character frame used for the kihon-hanmen + 2 * the line gap in the kihon-hanmen). (Details of this processing are defined in JIS X 4051, sec. 8.3.3.d). The heading text is usually set in the centre of the rectangular space in the block direction, and indented from the line head. The size of the indent is usually specified as a number of characters in the kihon-hanmen. For example, a '4 character indent' means (4 * the size of the character frames used for establishing the kihon-hanmen). (See the example at .)
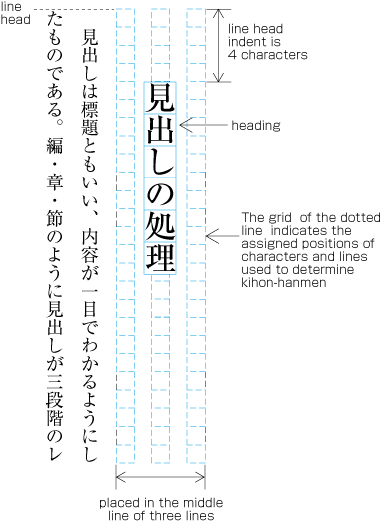
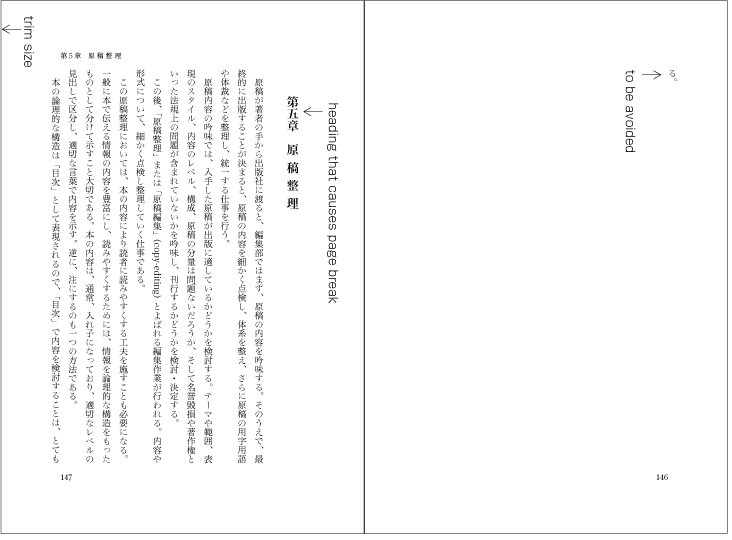
Layout example of a heading based on the line positions established by the kihon-hanmen. Details of the different types of heading, creation of headings, methods for placing headings, etc. is explained in 4.1 Handling of Headings (including Page Breaks).
-
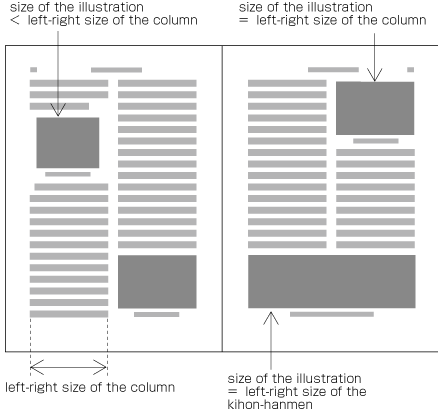
Size of illustrations
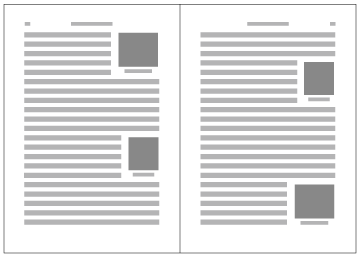
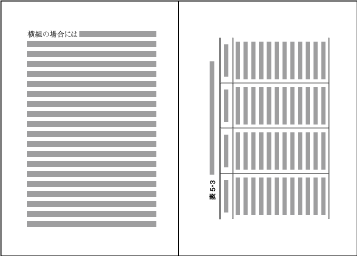
In horizontal writing mode with two columns, for example, the width of illustrations should, if at all possible, be either the width of one kihon-hanmen column or the width of the kihon-hanmen (see ). The illustrations are usually set at the head or the foot of the page (see ).
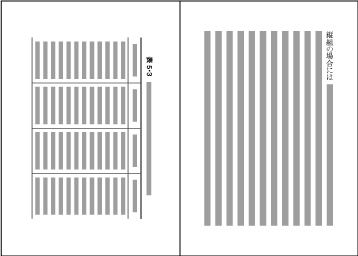
Example of illustrations in two columns, horizontal writing mode. Also, in vertical writing mode, for example with three columns, the height of illustrations should, if at all possible, be either the height of one kihon-hanmen column or the height of the kihon-hanmen (see ). The illustrations are usually set at the right side or left side of the kihon-hanmen (see ).
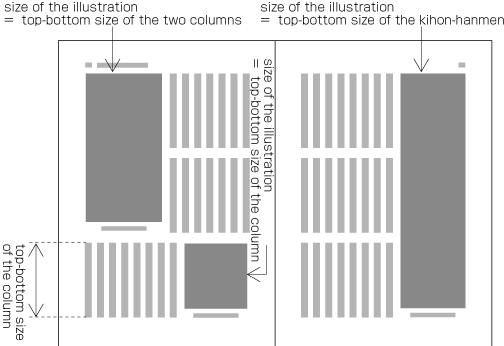
Example of illustrations in three columns, vertical writing mode. -
Hanmen size for the table of contents
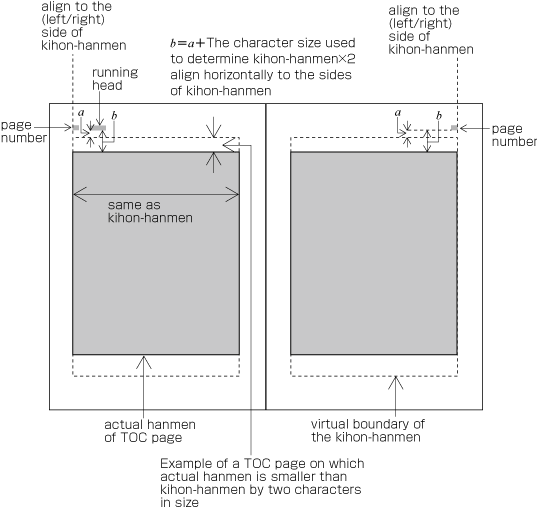
The hanmen size for the table of contents of books is based on the size of the kihon-hanmen. There are many examples of tables of contents in vertical writing mode where the left-to-right size is identical to that of the kihon-hanmen, but the top-to-bottom size is a little bit smaller (see ).
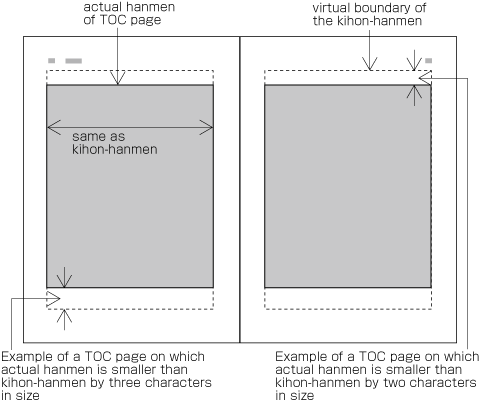
Example of the design of the table of contents (TOC) in vertical writing mode. There are cases when a different hanmen than the kihon-hanmen is used for positioning of running heads and page numbers. This will be discussed in (see ).
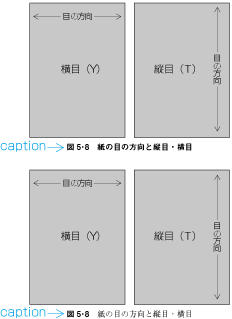
Vertical Writing Mode and Horizontal Writing Mode
Directional Factors in Japanese Composition
Japanese composition has two text directions. One is vertical direction (vertical writing mode), the other is horizontal direction (horizontal writing mode).
Major Differences between Vertical Writing Mode and Horizontal Writing Mode
The following are major differences between vertical writing mode and horizontal writing mode.
-
Arrangement of characters, lines, columns and pages; direction of page progression.
-
Vertical writing mode. See for an example of vertical writing mode with two columns per page.

Direction of arrangement of characters in vertical writing mode. -
Characters are arranged from top to bottom, lines are arranged from right to left.
-
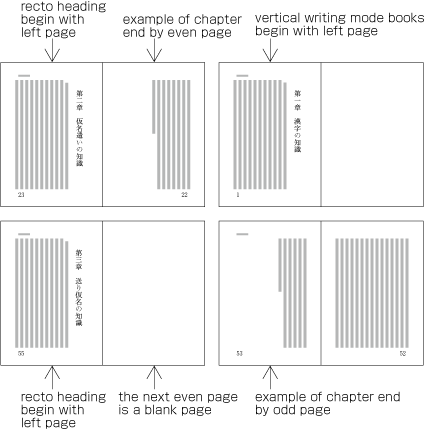
Columns are arranged from top to bottom. A book starts with the left (recto) side and progresses from right to left (see ).
Progression of pages for a vertically set books.
-
-
Horizontal composition. See for an example of horizontal text layout with two-columns per page.
Direction of arrangement of characters in horizontal writing mode. -
Characters are arranged from left to right, and lines are arranged from top to bottom.
-
Columns are arranged from left to right. A book starts with the right (recto) side and progresses from left to right (see ).
Progression of pages for a horizontally set book.
-
-
-
Orientation of Latin alphanumeric characters in a line.
-
There are three ways to arrange Latin alphanumerics in vertical writing mode:
-
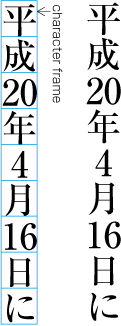
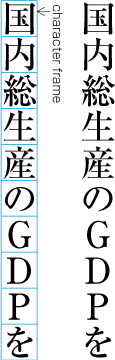
One by one with the same normal orientation as that of Japanese characters. This is usually applied to one-letter alphanumerics or capitalized abbreviations (see ).
Arrangement of alphanumerics in vertical writing mode - normal orientation. -
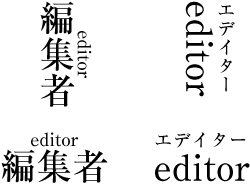
Rotated 90 degrees clockwise. This is usually applied to English words or sentences (see ).
Arrangement of alphanumerics in vertical writing mode - rotated 90 degrees clockwise. -
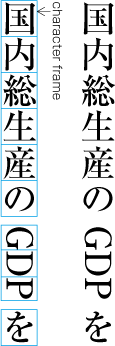
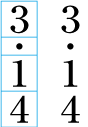
Set horizontally without changing orientation (called tate-chu-yoko, which means horizontal-in-vertical composition) (see ). This is usually applied to two-digit numbers (see JIS X 4051, sec. 4.8 for the definition).
Arrangement of alphanumerics in vertical writing mode - tate-chu-yoko.
-
-
In horizontal writing mode there is only one way of arranging alphanumerics, i.e. normal orientation.
-
-
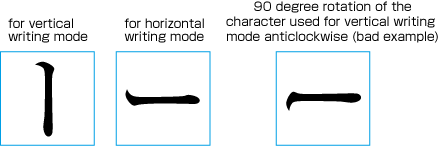
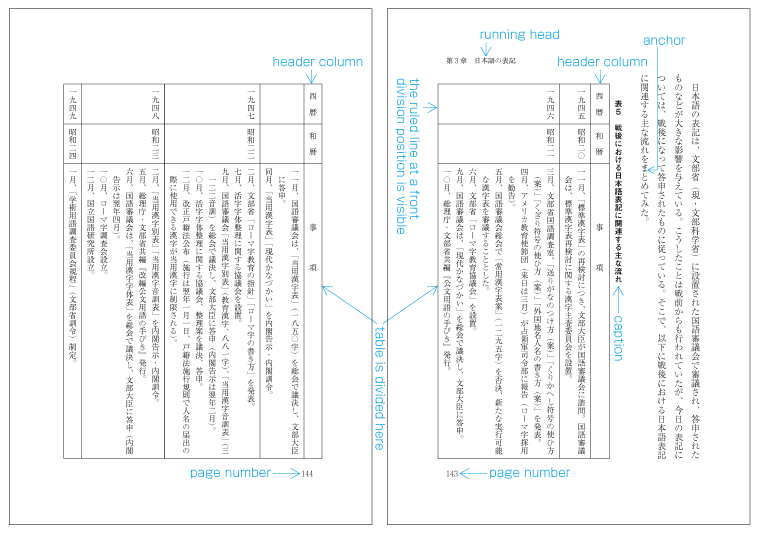
Arrangement of tables and/or illustrations rotated 90 degrees clockwise or counter-clockwise for reasons of size. (This processing is defined in JIS X 4051, sec. 7.3.).
-
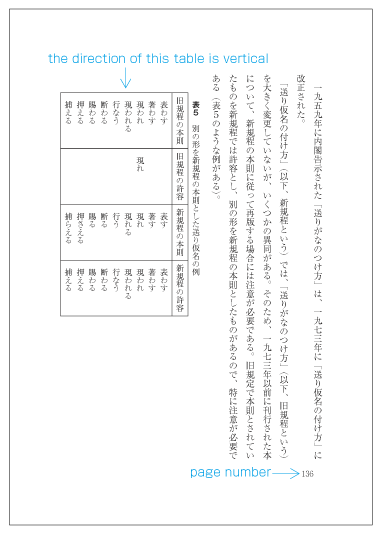
In vertical writing mode, align the top of tables/illustrations to the right of the page (see ).
Example of arrangement of a table rotated 90 degrees clockwise in vertical writing mode. -
In horizontal writing mode, align the top of tables/illustrations to the left of the page (see ).
Example of arrangement of a table rotated 90 degrees counterclockwise in horizontal writing mode.
-
-
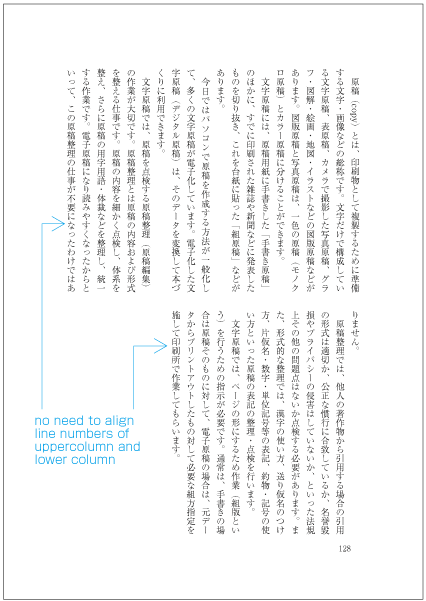
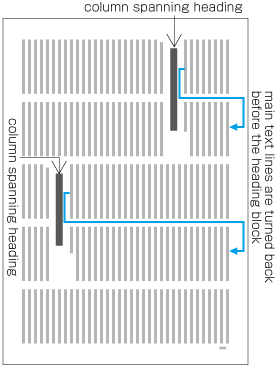
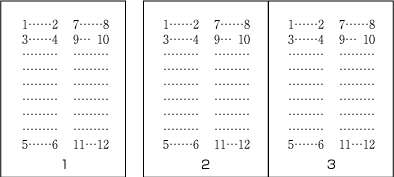
Arrangement of an incomplete number of lines on a multi-column format page due to new recto, page break or other reasons. (The processing of new recto and page break is defined in JIS X 4051, sec. 8.1.1.).
-
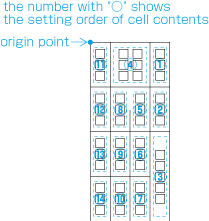
In vertical writing mode, just finish the line where it ends ("nariyuki"). The number of lines in each column is not uniform (see ).
How to process incomplete number of lines on a multi-column format page (vertically set book). -
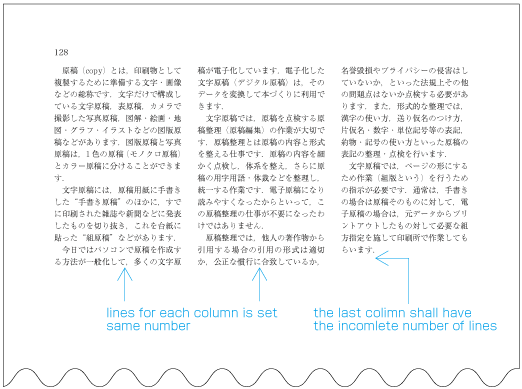
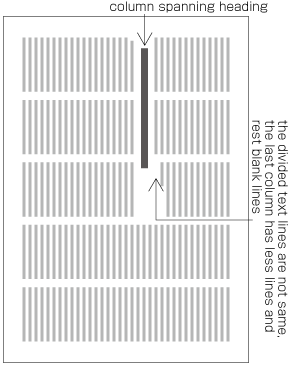
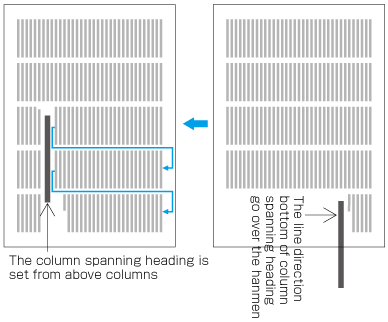
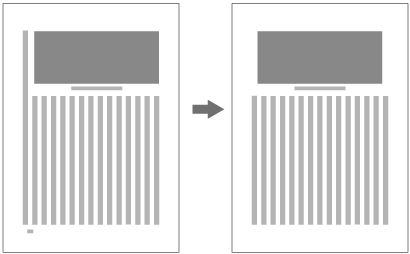
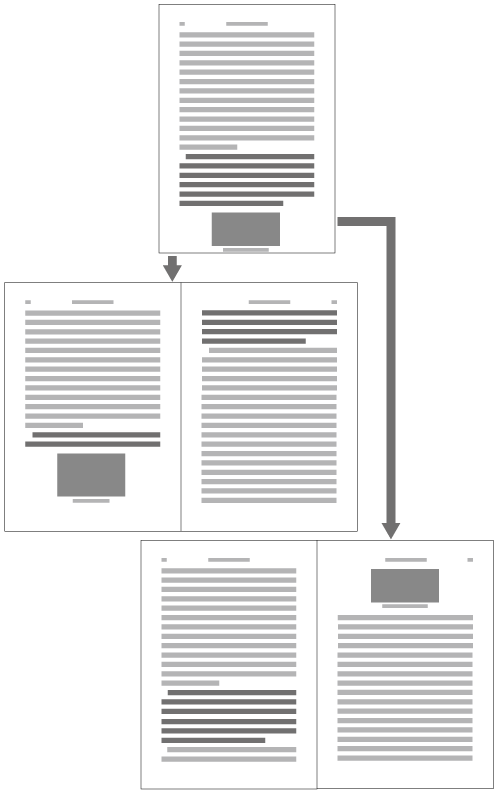
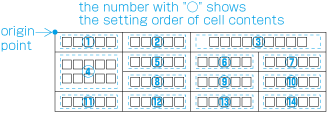
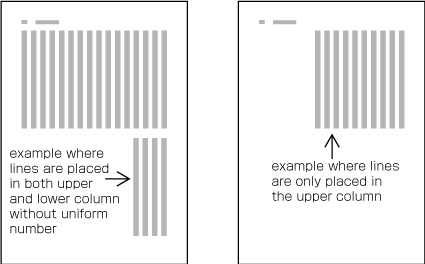
In horizontal writing mode, re-arrange columns so that each column has the same number of lines. In case the number of lines is not divisible by the number of columns, add the smallest number to make it divisible and re-arrange columns using the quotient as the number of lines so that only the last column shall have the incomplete number of lines (see ).
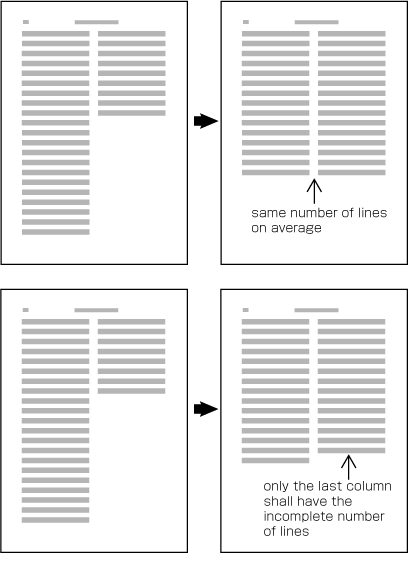
How to process incomplete number of lines on a multi-column format page (horizontally set book).
-
Specifying the Kihon-hanmen
Procedure for Defining the Kihon-hanmen
In Japanese composition, first the size of the kihon-hanmen is defined, using the square character frames of characters in solid setting. Taking this as a base, the position of the kihon-hanmen with regards to the trim size is then specified. The following are procedures for determining the size and position of the kihon-hanmen (see ).
-
Specifying the dimensions of the kihon-hanmen.
-
For a document with a single column per page, specify the character size, the line length (the number of characters per line), the number of lines per page, and the line gap.
-
For a document with multiple columns per page, specify the character size, the line length (the number of characters per line), the number of lines per column, the line-gap, and the number of columns and the column gap.
Procedures to determine the size and position of the kihon-hanmen, step 1.
-
-
Determining the position of the kihon-hanmen relative to the trim size.
There are various alternative methods for specifying the position of the kihon-hanmen relative to the trim size:
-
Position vertically by centering the kihon-hanmen. Position horizontally by centering the kihon-hanmen.
-
Position vertically by specifying the space size at the head (for horizontal writing mode) or the space at the foot (for vertical writing mode). Position horizontally by centering the kihon-hanmen.
-
Position vertically by centering the kihon-hanmen. Position horizontally by specifying the space size of the gutter.
-
Position vertically by specifying the space at the head (for horizontal writing mode) or the space at the foot (for vertical writing mode). Position horizontally by specifying the space size of the gutter.
Procedures to determine the size and position of the kihon-hanmen, step 2. -
Considerations in Designing the Kihon-hanmen
The following are considerations to take into account when designing the kihon-hanmen. (This topic is not about processing, but rather an explanation of design preferences. The definition of kihon-hanmen is given in JIS X 4051, sec. 7.4.1.)
-
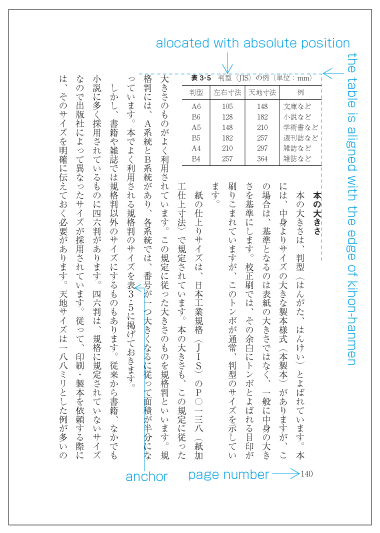
Trim size and margins. It would be best if the shape of the kihon-hanmen could be made similar to that of the trim size.
-
Character size. Generally 9 point (about 3.2mm) type is common. Except for specialized publications such as dictionaries, the minimum size of type is 8 point (about 2.8mm).
-
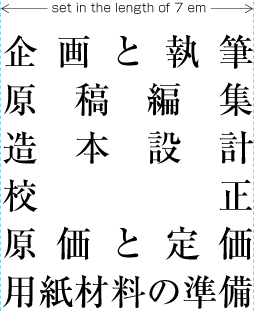
Line length should be multiples of the character size (see ).
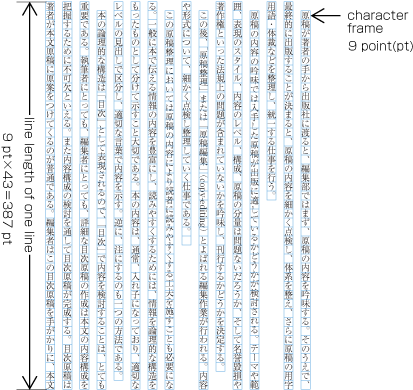
Line length should be multiples of the character size. -
Use the same amount of line gap throughout the book, except for special cases. The size of the kihon-hanmen in the block direction is specified using the number of lines and the size of the line-gap.
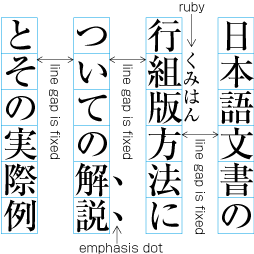
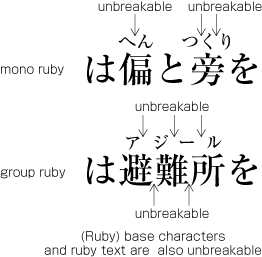
Inserting ruby or other items between lines. 
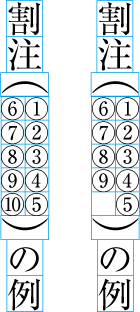
Example of inter-line processing with warichu between lines. 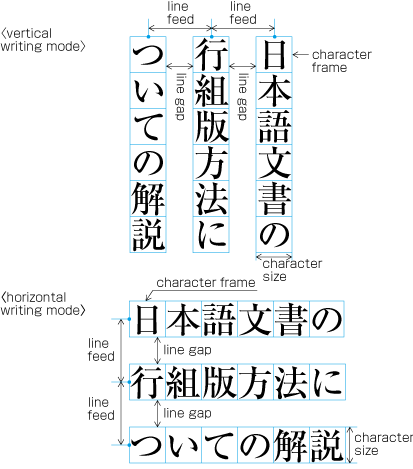
Specifying kihon-hanmen with line feed.
The size of the kihon-hanmen in this case can be calculated by following method:
-
Vertical writing mode with one column
Width of kihon-hanmen = character size × number of lines per page + line gap × (number of lines per page − 1)
298 point = 9 point × 18 lines + 8 point × (18 lines − 1)
Height of kihon-hanmen = character size × number of characters per line
468 point = 9 point × 52 characters
-
Vertical writing mode with multi columns
Width of kihon-hanmen = character size × number of lines per column + line gap × (number of lines per column − 1)
309 point = 9 point × 21 lines + 6 point × (21 lines − 1)
Height of kihon-hanmen = character size × number of characters per line × number of columns + column gap × (number of columns − 1)
468 point = 9 point × 25 characters × 2 columns + 18 point × (2 columns − 1)
-
Horizontal writing mode with one column
Width of kihon-hanmen = character size × number of characters per line
315 point = 9 point × 35 characters
Height of kihon-hanmen = character size × number of lines per page + line gap × (number of lines per page − 1)
468 point = 9 point × 28 lines + 8 point × (28 lines − 1)
-
Horizontal writing mode with multi columns
Width of kihon-hanmen = character size × number of characters per line × number of columns + column gap × (number of columns − 1)
320 point = 8 point × 19 characters × 2 columns + 16 point × (2 columns − 1)
Height of kihon-hanmen = character size × number of lines per column + line gap × (number of lines per column − 1)
476 point = 8 point × 40 lines + 4 point × (40 lines − 1)
Page wise Arrangement of Kihon-hanmen Elements
Examples of Items Jutting Out of the Kihon-hanmen
The various elements of a page should remain inside the boundaries of the kihon-hanmen. However, there are exceptions such as the following:
-
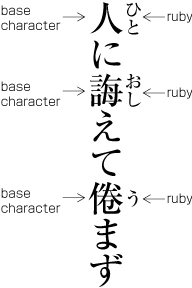
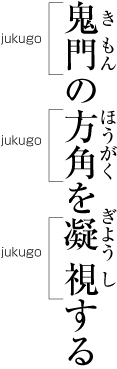
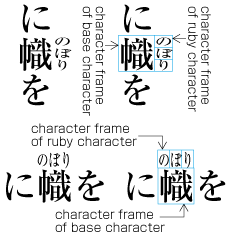
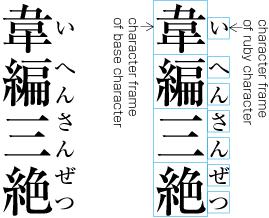
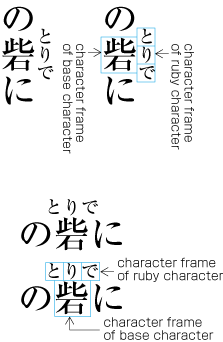
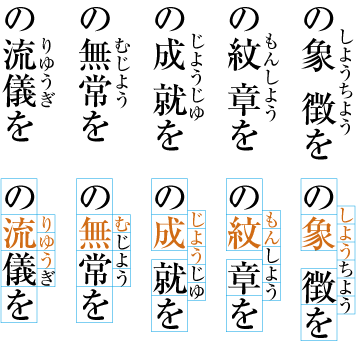
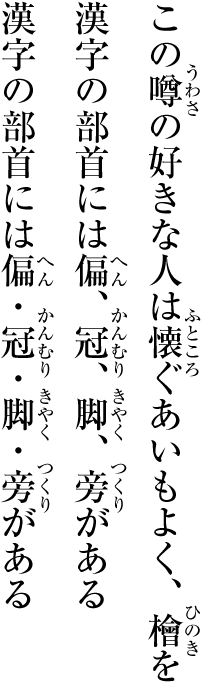
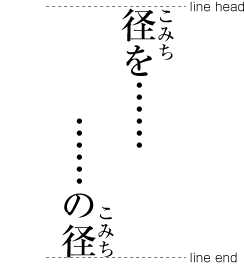
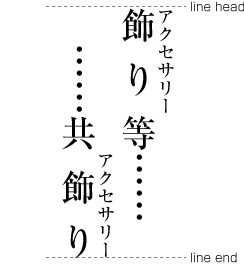
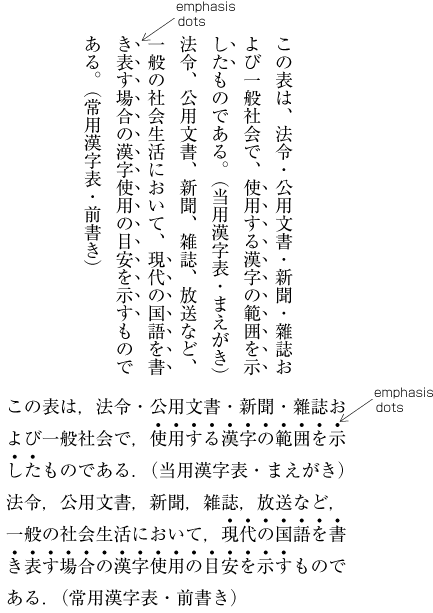
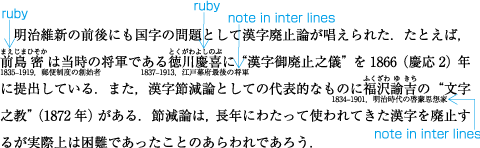
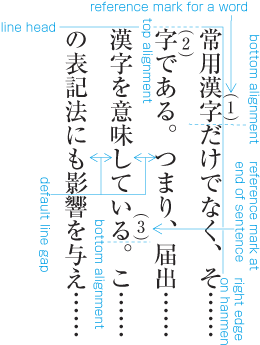
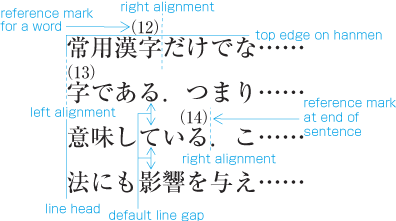
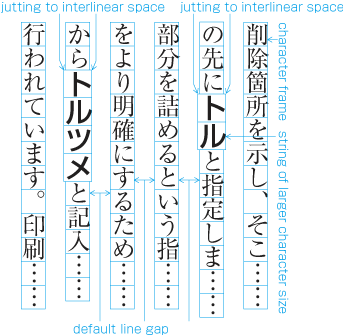
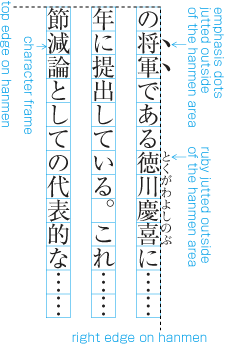
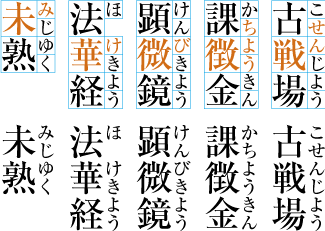
Ruby or emphasis marks (bousen, emphasis dots, etc.) at the before edge of the hanmen, are placed outside the hanmen (see ). The same applies in cases where ruby, underline, etc. appear beyond the after edge of the hanmen. Like the handling of exceptions mentioned below, the purpose here is to preserve the line positions established for the kihon-hanmen. This technique can also be used for reference marks associated with lines of text.
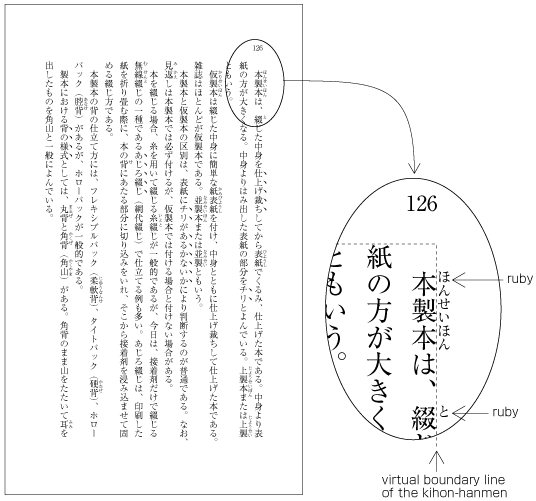
Example of ruby annotation placed outside of the kihon-hanmen. -
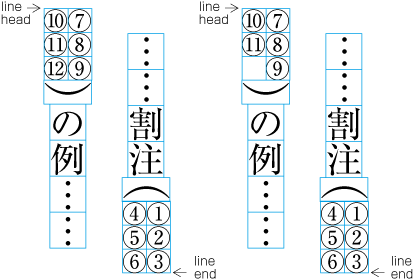
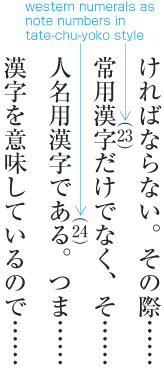
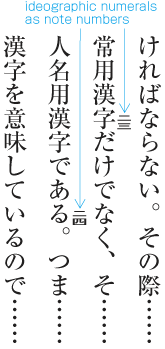
When there are inline elements whose dimensions extend beyond the before edge and the after edge of a line of characters as determined by the kihon-hanmen, and when those elements appear in the first or last line of the hanmen, the parts that jut out beyond the regular line of characters also jut out of the hanmen area. For example, this is the case when the width of a sequence of characters which are set to tate-chu-yoko is wider than the characters set for the kihon-hanmen. In addition, warichu (inline cutting note) or subscript and superscript (ornament characters) are handled in the same way. (The processing rules for this item and the previous item are defined in JIS X 4051, sec. 12.1.1.)
-
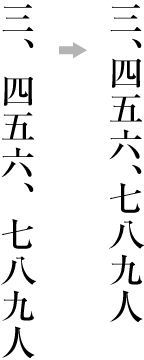
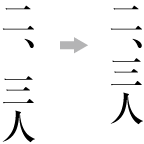
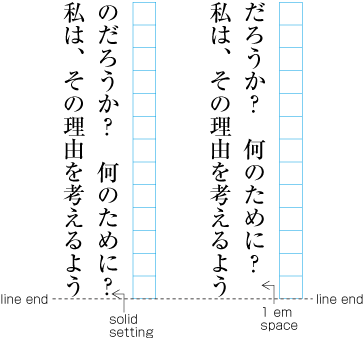
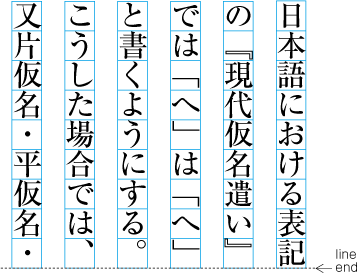
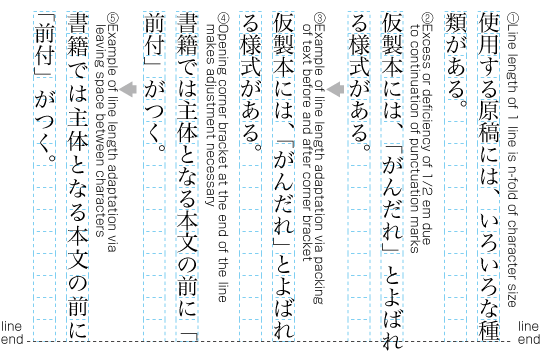
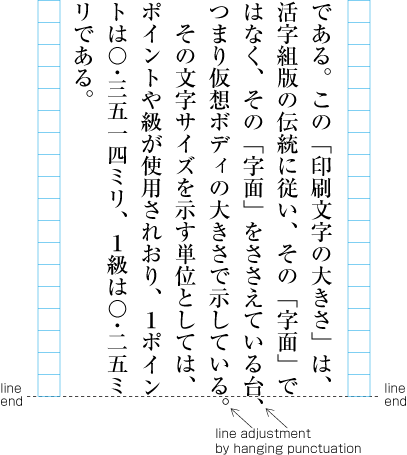
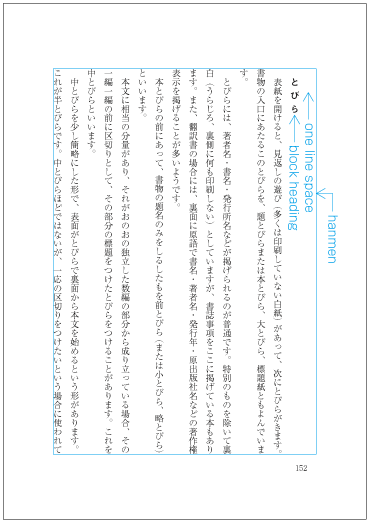
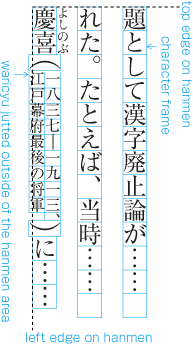
Line adjustment by hanging punctuation is only necessary for full stops (cl-06) and commas (cl-07) when they would otherwise need to be wrapped to the line head. The character is placed so that it touches the hanmen at the line end (see ). (Hanging punctuation is not defined in JIS X 4051, but there is an explanation in sec. 8.1, c.)
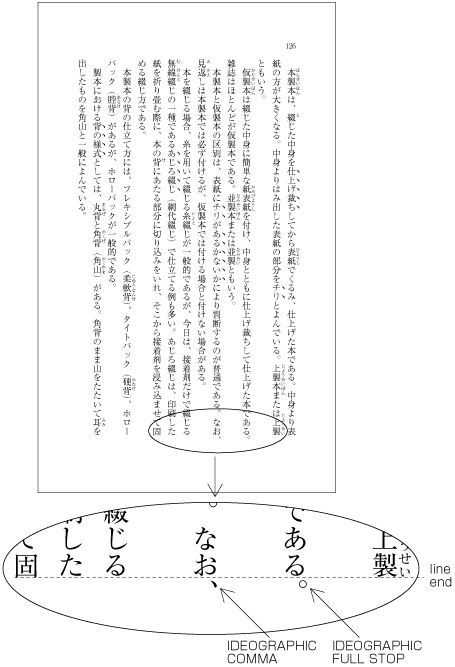
Example of IDEOGRAPHIC COMMA and IDEOGRAPHIC FULL STOP placed below the kihon-hanmen. -
Illustrations and tables are normally placed inside the area defined by the kihon-hanmen. However, there may also be cases in which a particular illustration or table juts outside the kihon-hanmen.
-
Cases in which it is necessary to make the illustration or table larger than the kihon-hanmen, because reducing its size would make it unreadable.
-
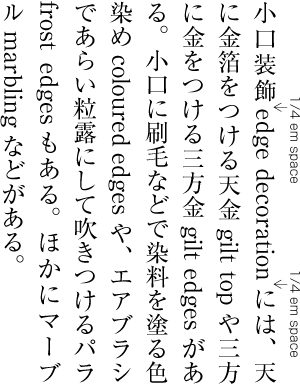
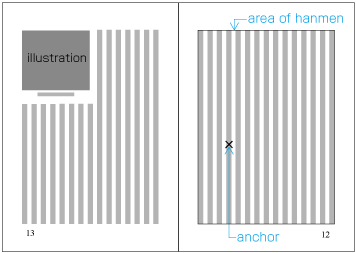
For the sake of visual effect, the illustration may bleed into the complete paper area. This is not often used in books, but is often used in magazines (see ).
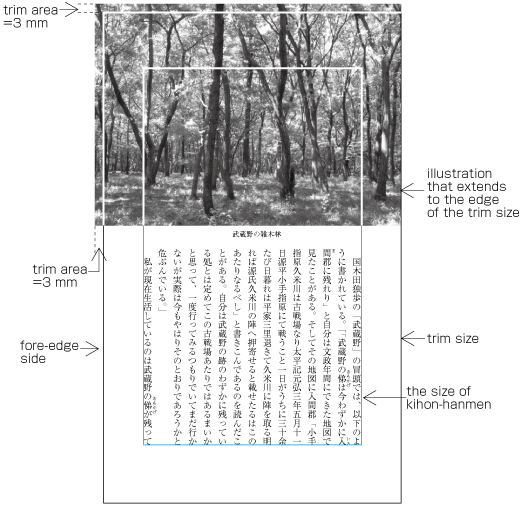
Example of bleeds.
-
-
Magazines may place the captions of illustrations outside the column area or in the column gap. (Some people regard this as bad style.)
Line Positioning based on the Kihon-hanmen Design
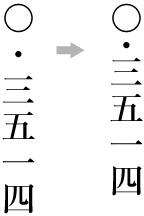
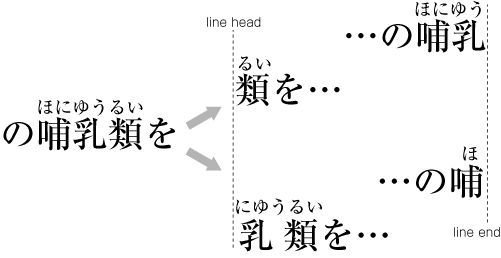
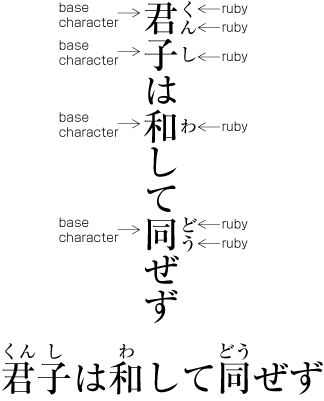
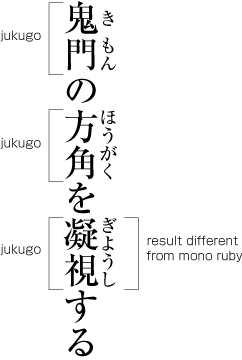
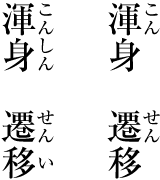
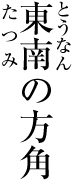
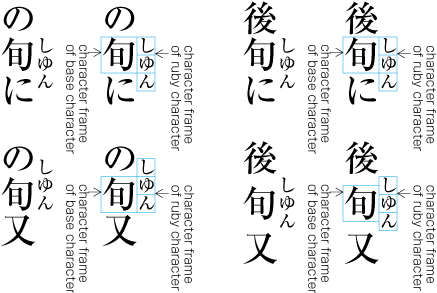
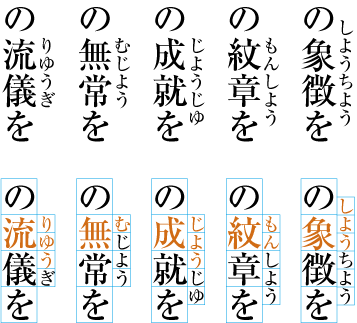
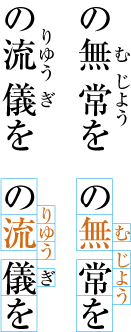
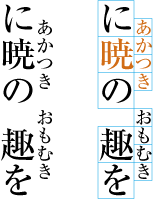
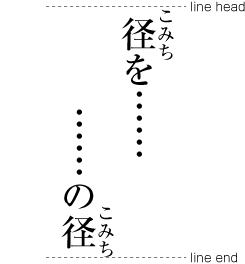
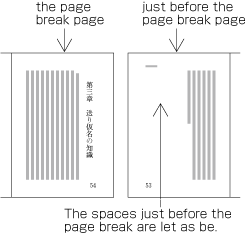
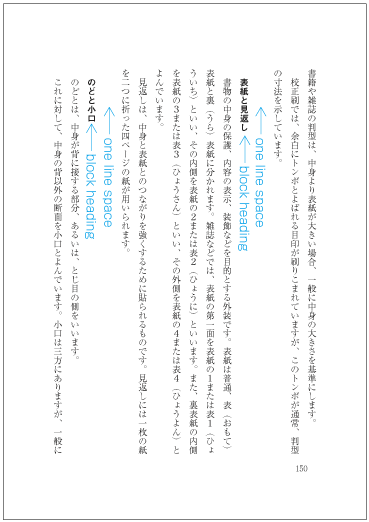
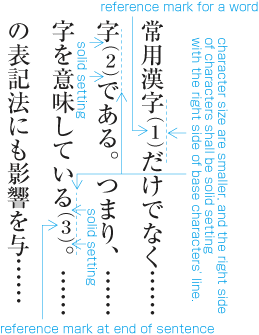
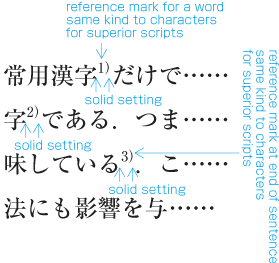
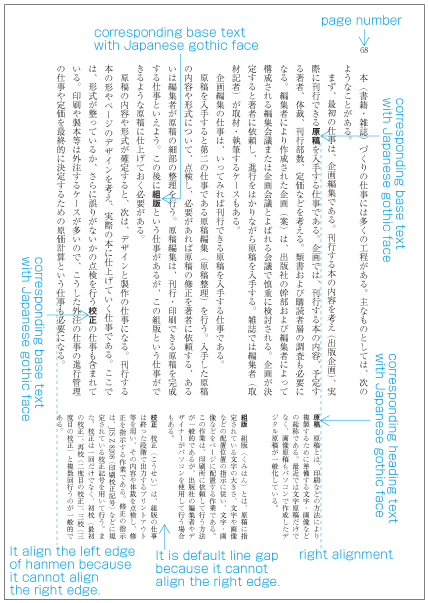
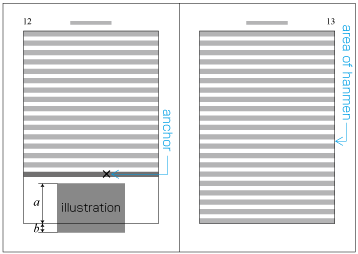
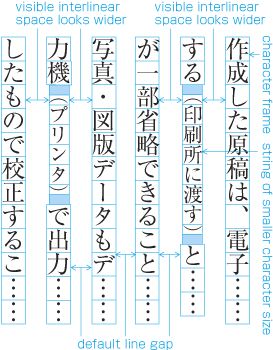
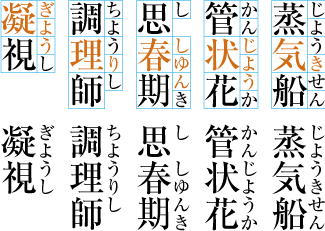
In principle, pagewise positioning of lines relies on the line positions established for the kihon-hanmen. This holds for lines with ruby or emphasis dots as shown in . Even when lines contain characters that are smaller than the character size used for the kihon-hanmen (as shown in ), the line positions used for the kihon-hanmen continue to be used as the basic guide lines. This is so that following lines with normal-sized characters still naturally fall into the line positions established for the kihon-hanmen.

The following are exceptions when handling line position:
-
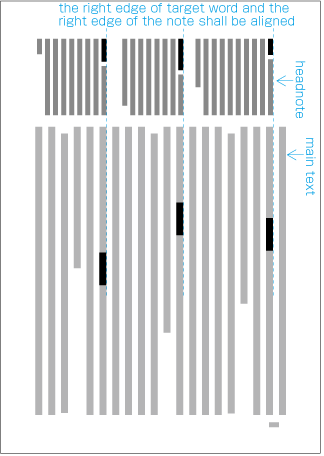
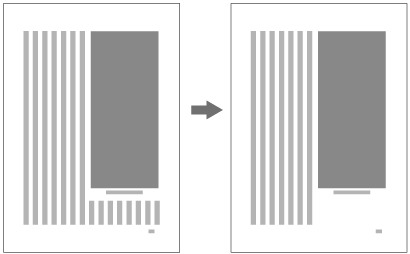
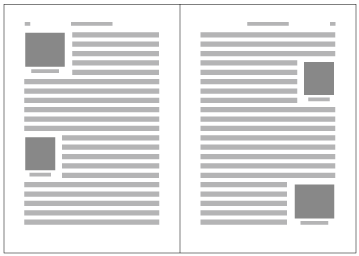
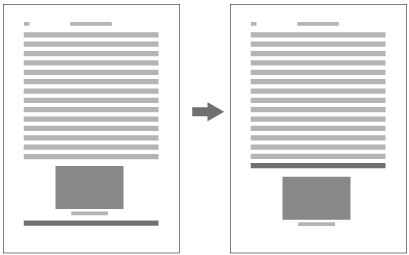
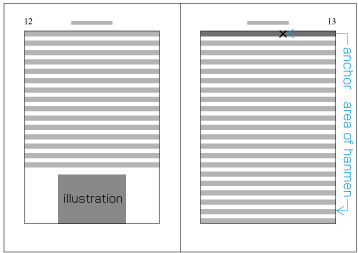
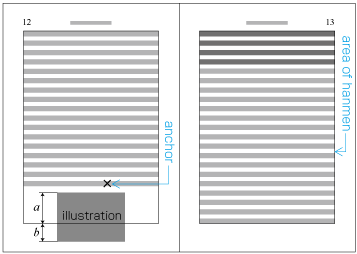
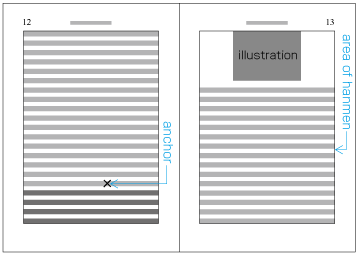
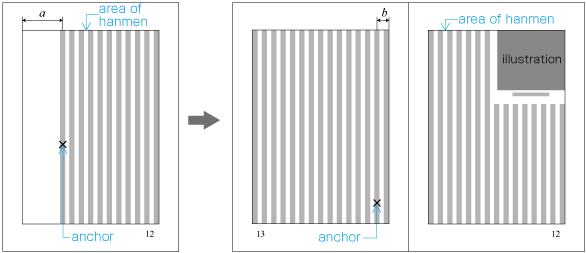
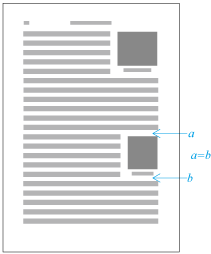
When inserting more than one illustration or table item in horizontal writing mode, assuming that there is no text to the left or right of the items, the items may either slip off the lines established for the kihon-hanmen (see ), or stick to the lines (see ). The former approach is used, whenever possible, to achieve inter-character spacing before and after illustrations or tables constant. (This method is often used in books.) (This processing method is defined in JIS X 4051, sec. 10.3.2., d.)
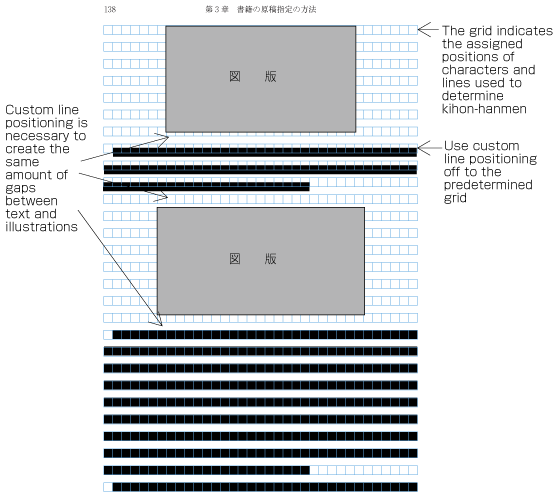
Positioning of lines with multiple illustrations - 1. 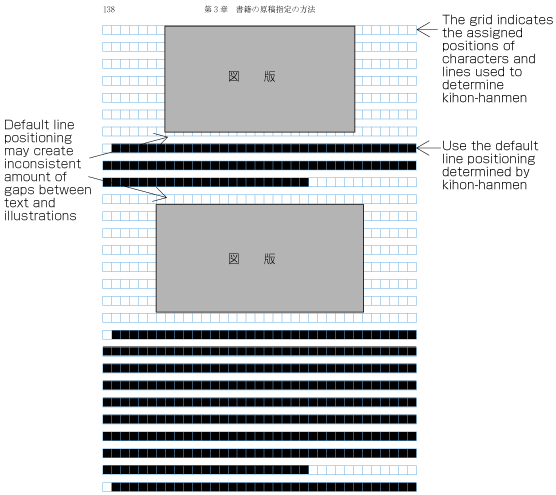
Positioning of lines with multiple illustrations - 2. -
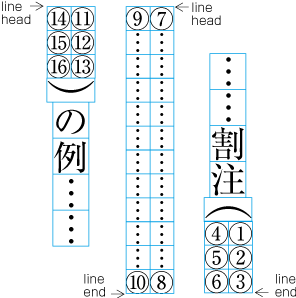
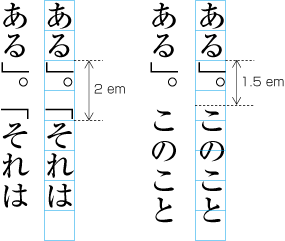
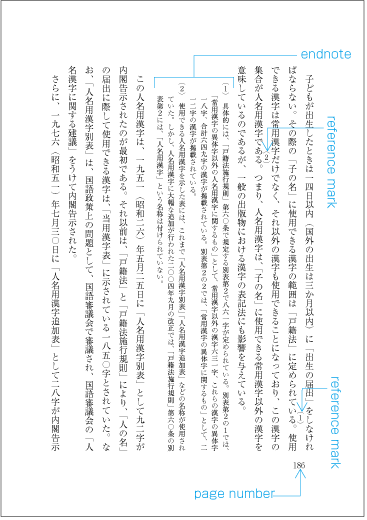
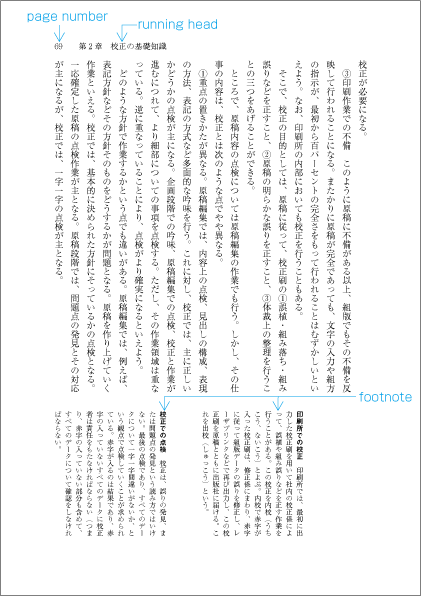
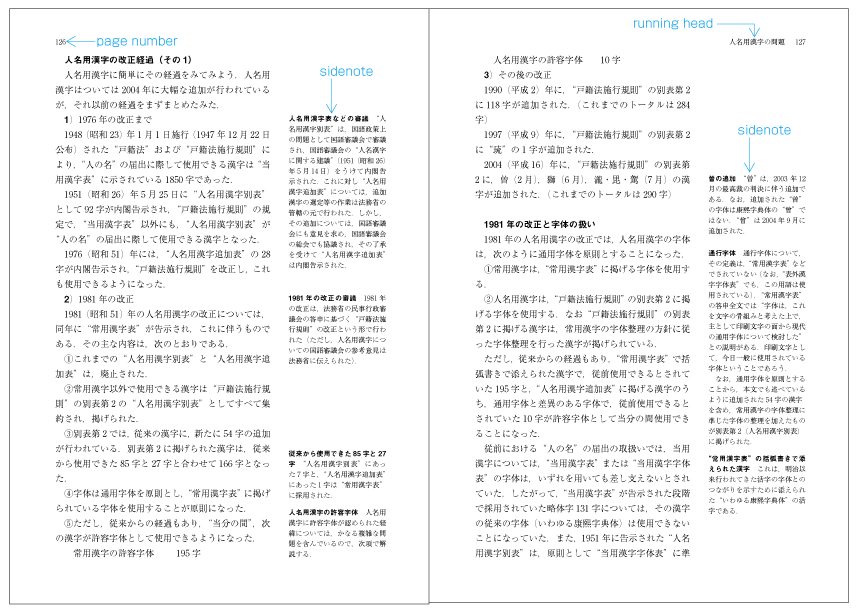
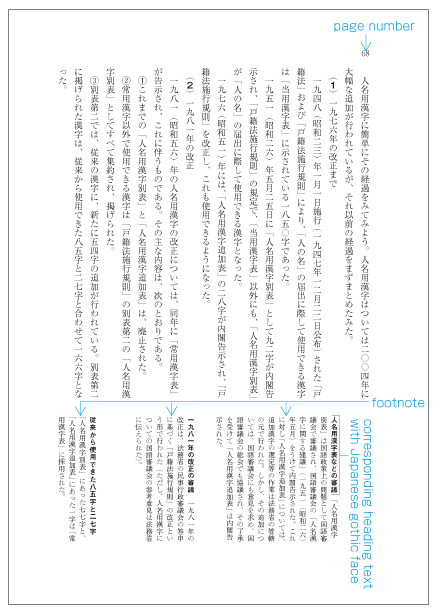
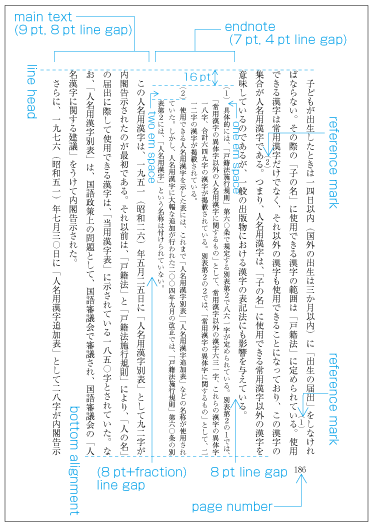
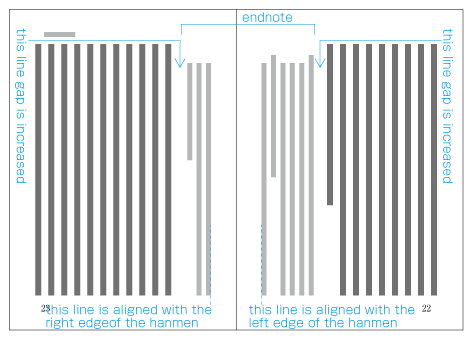
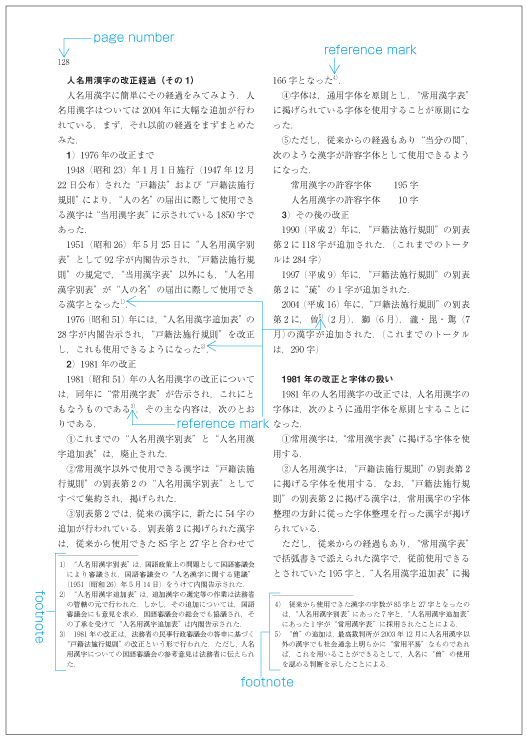
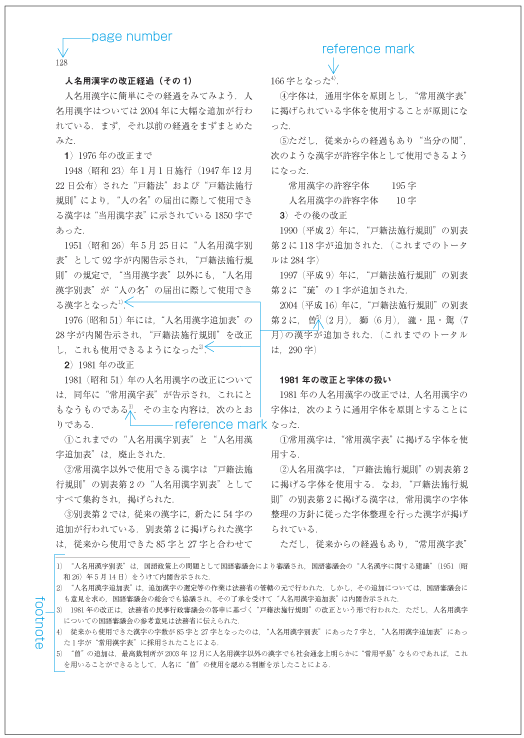
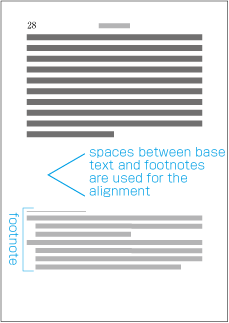
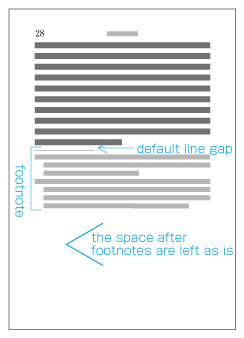
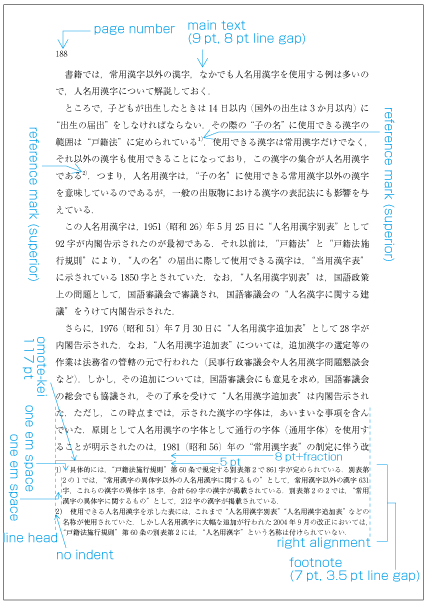
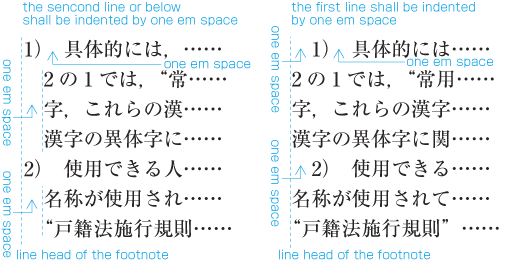
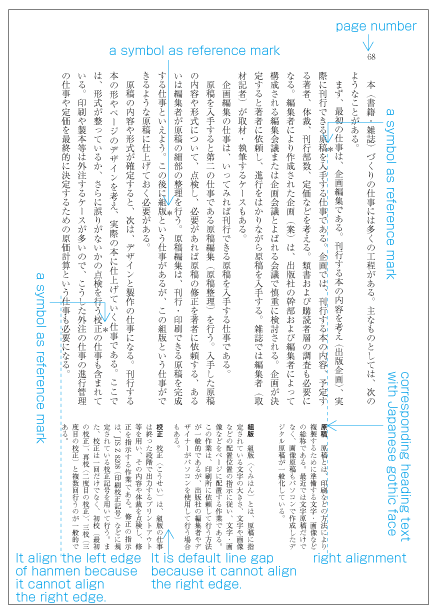
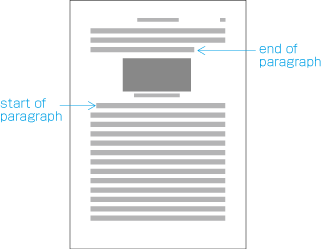
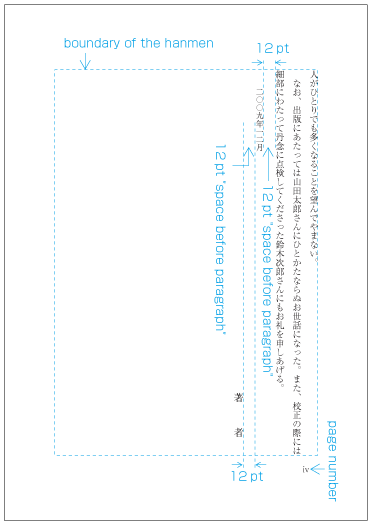
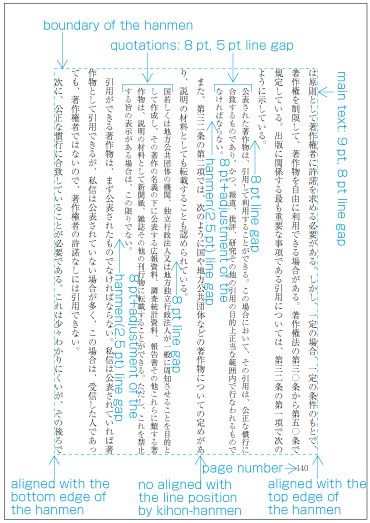
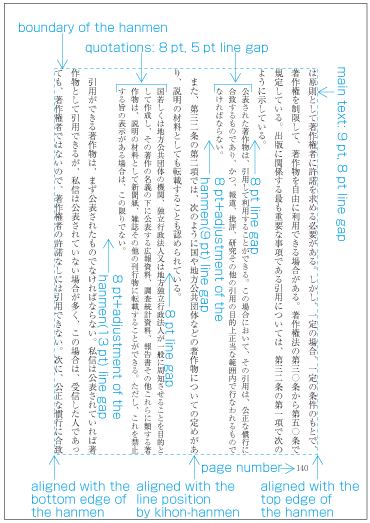
The size of characters in endnotes inserted between paragraphs or those in footnotes at the bottom of the page (in horizontal writing mode) is smaller than the character size established for the kihon-hanmen. As a result, the character size and line gap are also smaller, and so the line positions are no longer identical to those established for the kihon-hanmen. As an example, shows the position of an endnote between paragraphs in vertical writing mode. (The processing of endnotes is defined in JIS X 4051, sec. 9.3, and the processing of footnotes in sec. 9.4.)
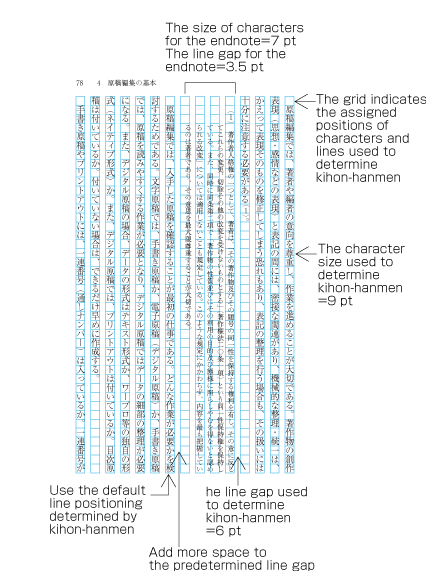
Positioning of an endnote in vertical writing mode. -
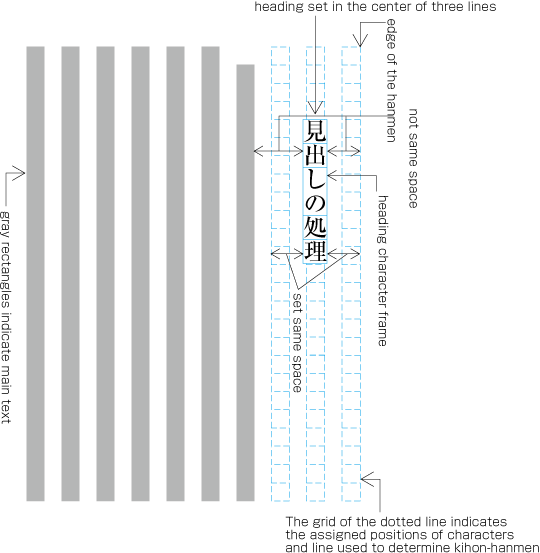
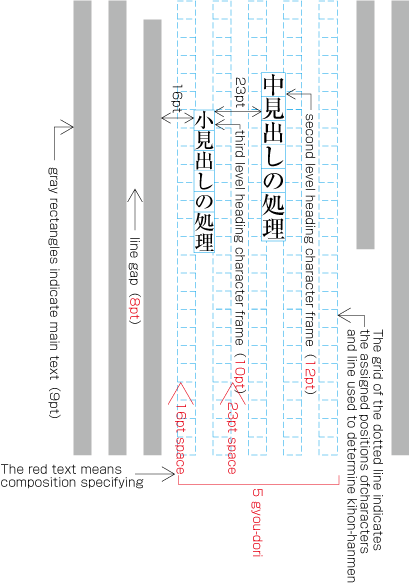
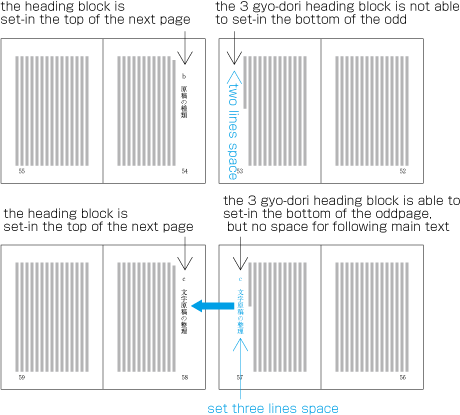
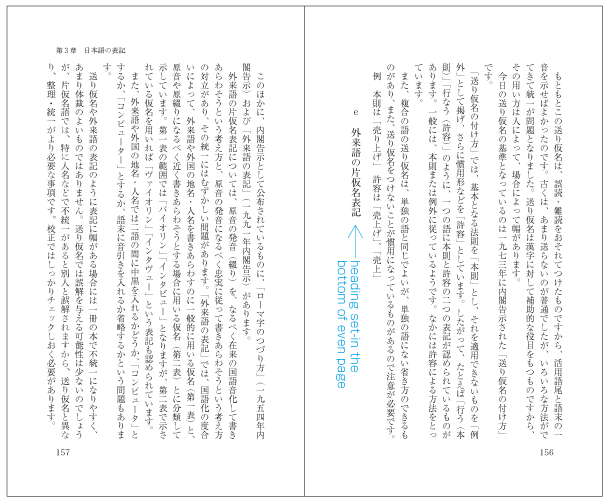
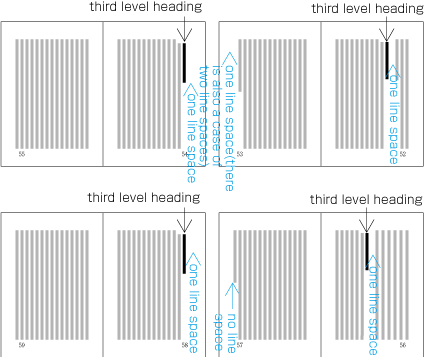
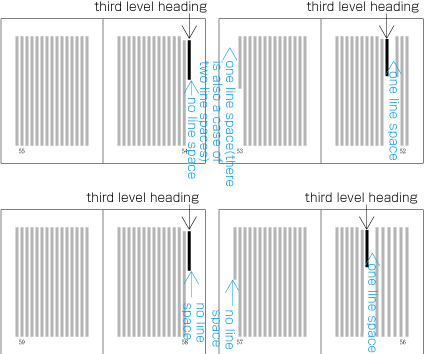
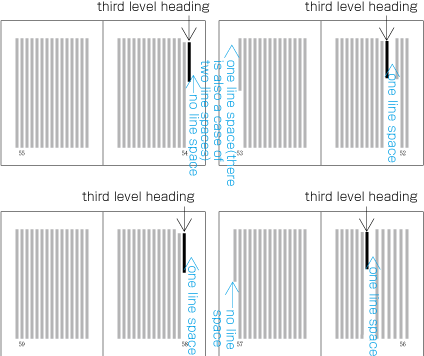
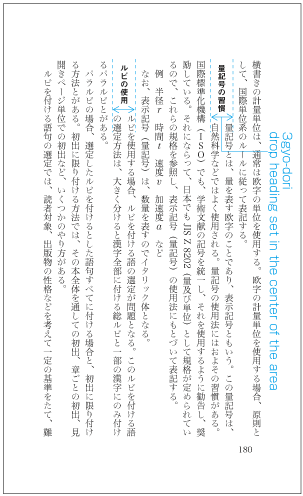
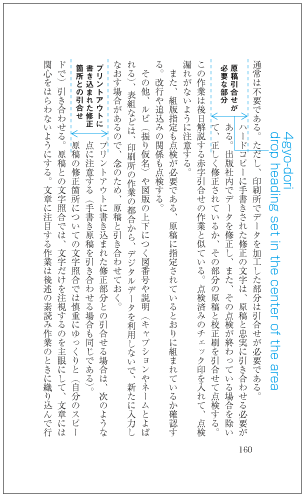
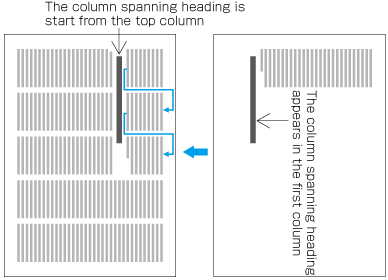
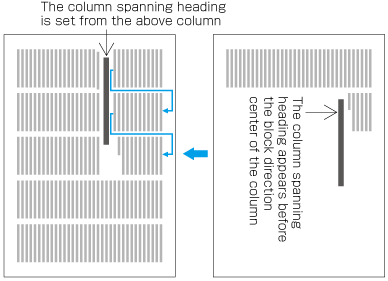
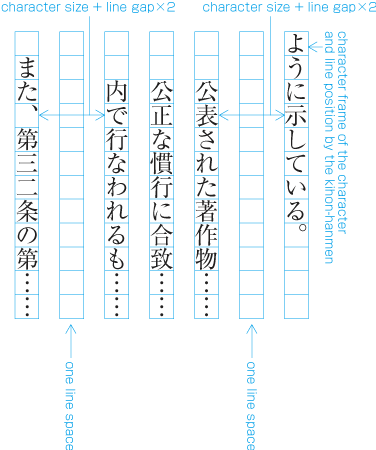
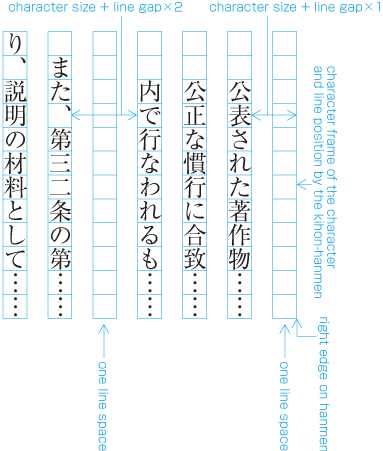
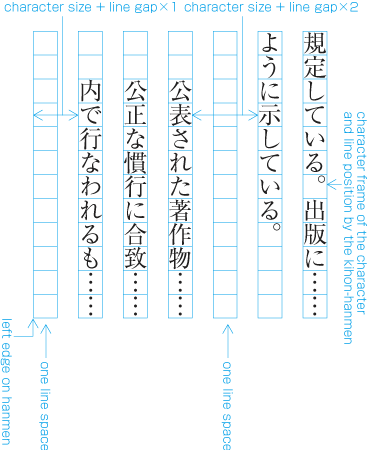
As mentioned above, the position of a heading may not be identical to the lines established for the kihon-hanmen. Nevertheless, in the block direction, headings base their alignment on the line positions established for the kihon-hanmen (see ).
Character Positioning based on Kihon-hanmen Design
In principle, the characters in each line follow the solid setting positions of characters established for the kihon-hanmen. However, as already shown in some of the previous figures, there are examples where this is not the case. Such cases are rather common, and here we will show some prototypical examples (details will be given in ).
-
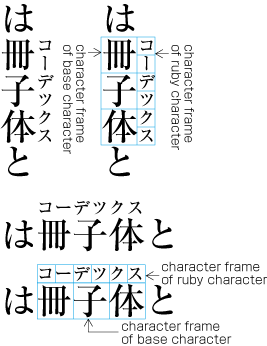
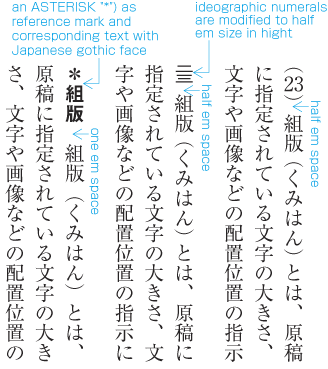
When 9pt is the character size used to establish the kihon-hanmen, characters smaller than 9pt may be inserted in part of a line (see ). In such cases, the parts set at 9pt and any parts set at a smaller, say, 8pt size both use solid setting, with character frames at the respective sizes for each part.
-
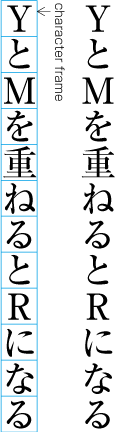
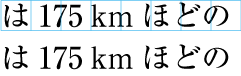
In cases where proportional Latin letters are rotated 90 degrees clockwise (see ), the proportional letters are placed according to their proportional widths. Hence, they do not fit to the character positions established for the kihon-hanmen (see ). Japanese letters following the Latin letters consequently slip away from the default positions as well.
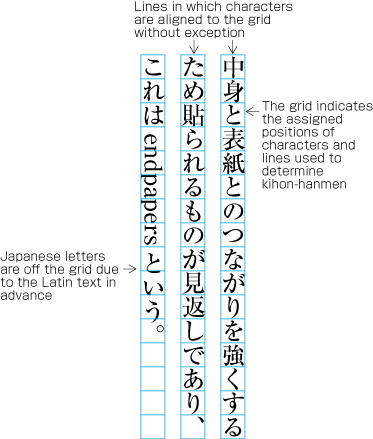
Positioning of a mixture of Western and Japanese letters in a line. -
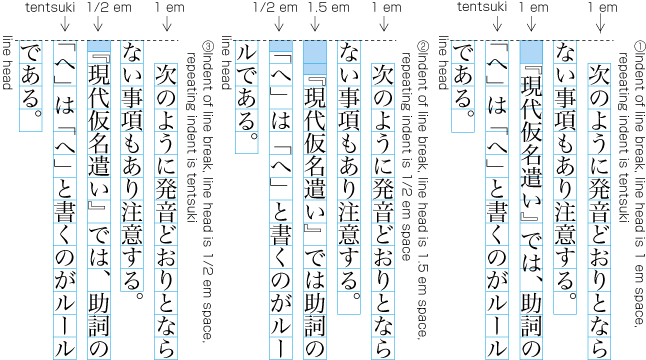
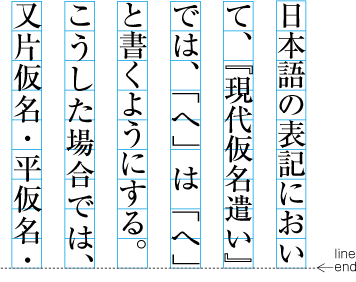
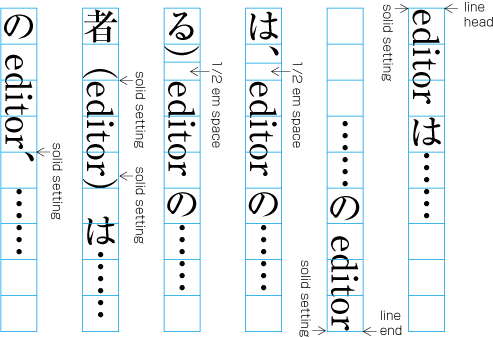
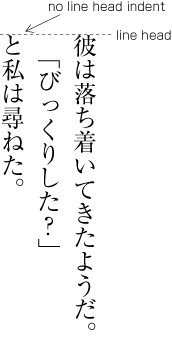
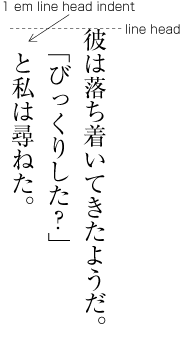
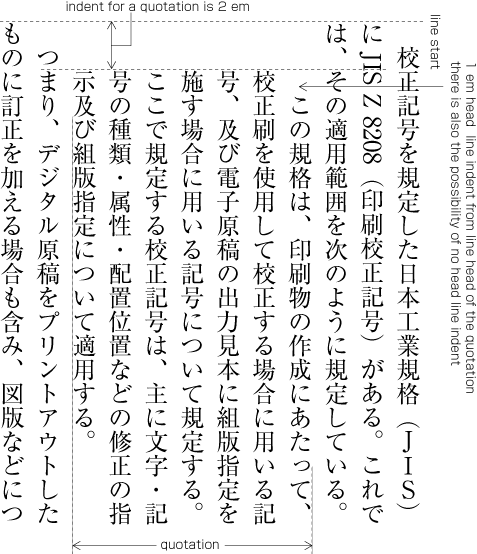
There are several methods for positioning opening brackets (cl-01) at the beginning of a line (details are explained in ). Because an opening bracket is not a full-width character, in cases where the indentation of the first line of a paragraph is a one em space, or if the tentsuki position is used for the bracket (that is, there is no space at the line head), the character following the bracket will be in a position which does not fit to the character positions established for the kihon-hanmen (see ). However, the adaptations made during the alignment of line ends will ensure that the character at the end of a line is at a position that fits with the kihon-hanmen.
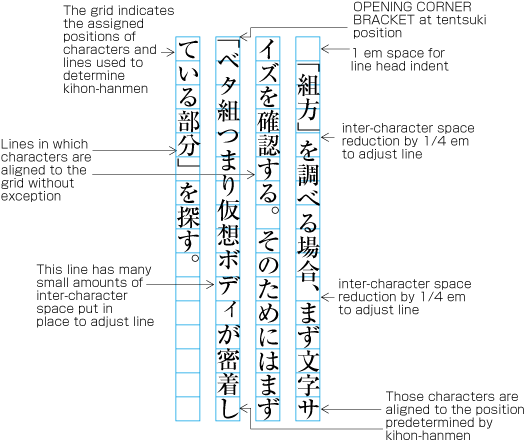
Example of positioning of characters off the kihon-hanmen position due to opening brackets at the line head. -
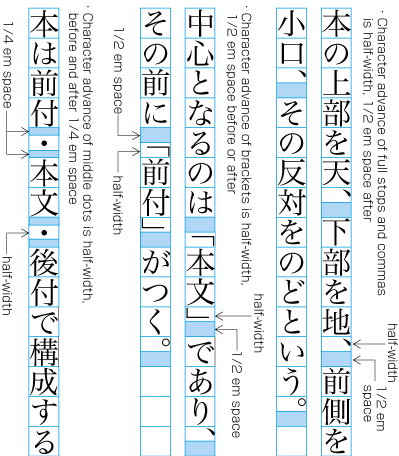
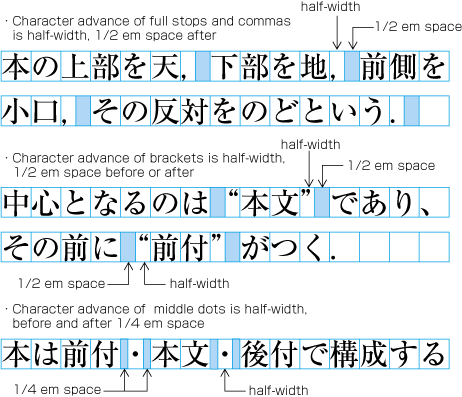
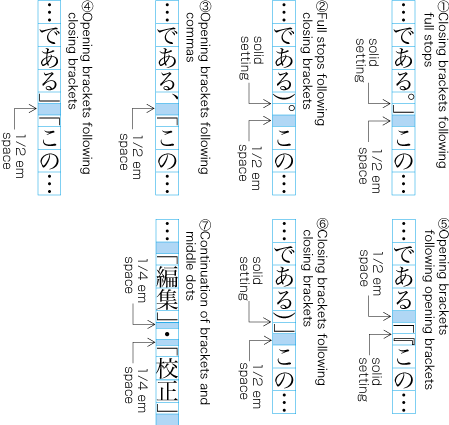
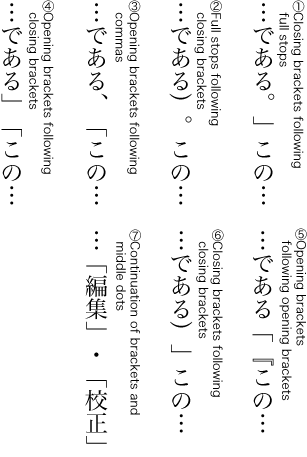
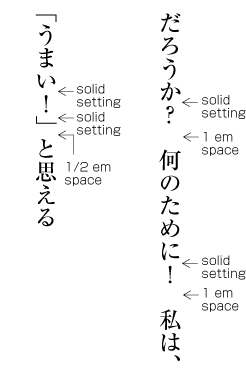
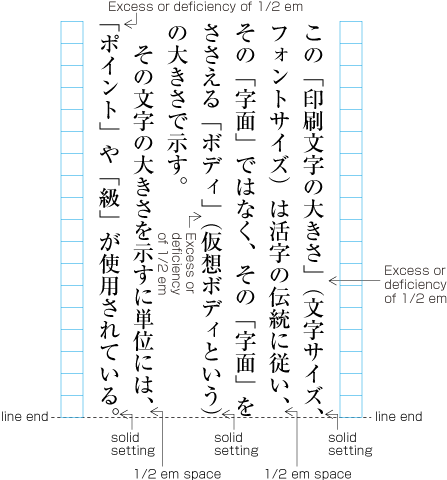
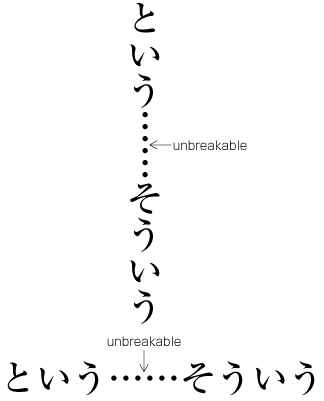
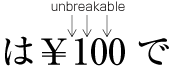
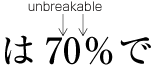
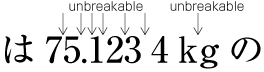
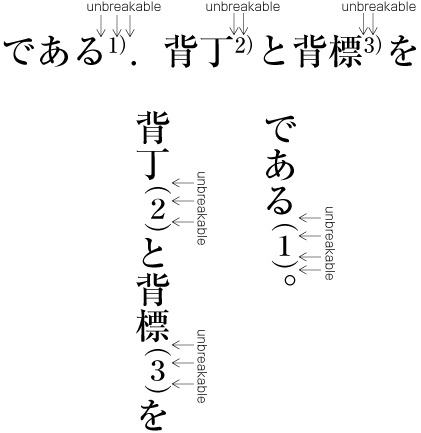
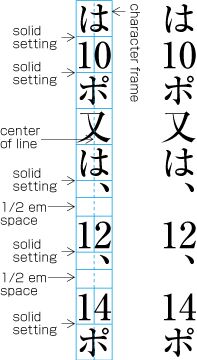
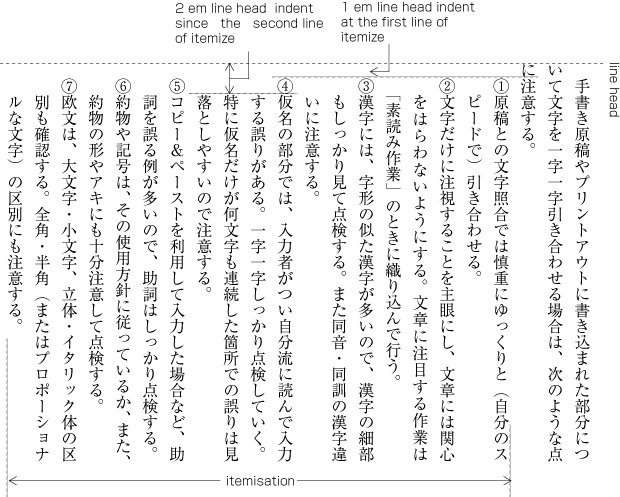
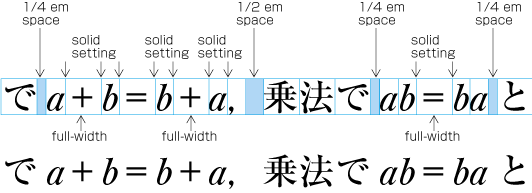
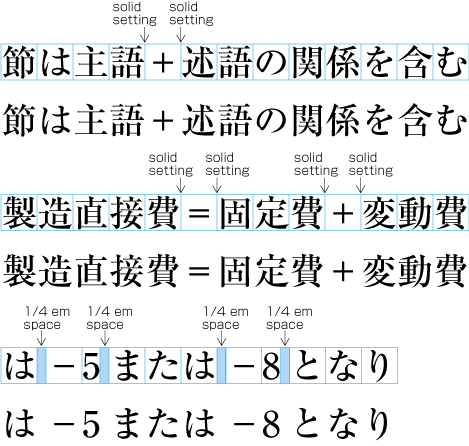
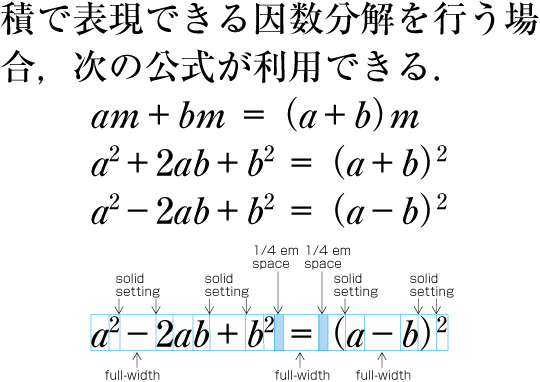
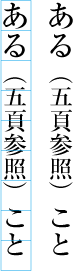
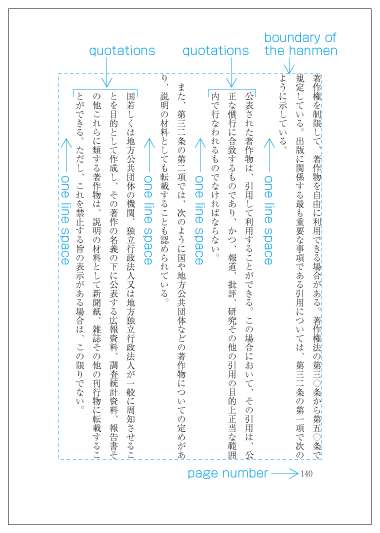
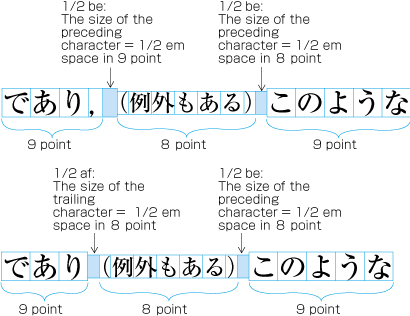
3 Line Composition explains that full stops (cl-06), commas (cl-07), opening brackets (cl-01) and closing brackets (cl-02) are half-width. If these punctuation marks and brackets are adjacent to ideographic (cl-19), katakana (cl-16) or hiragana (cl-15) characters, in principle there should be a half em space before or after the punctuation mark or brackets, so that these occupy in effect a full-width size. However, if they are adjacent to other punctuation marks or brackets, the half em space is not used. This is done to improve the visual appearance. In such cases, the character positions are different than the positions established when defining the kihon-hanmen (see ).
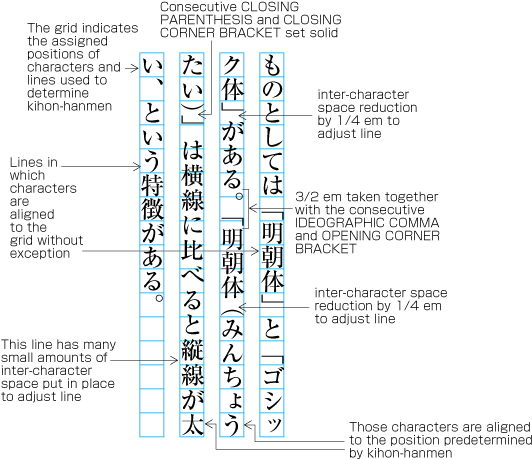
Example of lines with consecutive punctuation marks. -
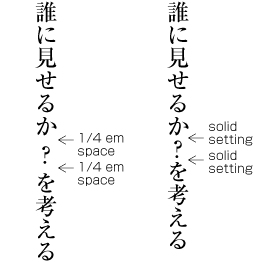
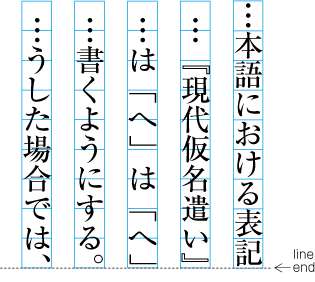
explains the principle that closing brackets (cl-02), full stops (cl-06) and commas (cl-07) should not be placed at the line head. If by simple sequential placement these characters would appear at the line head or at the line end, some kind of adjustment becomes necessary. A similar adjustment is required for characters that should not be placed at the end of a line, such as opening brackets (cl-01). As a result of such adjustment, it may happen that other characters are placed at positions which are different from those established for the kihon-hanmen.
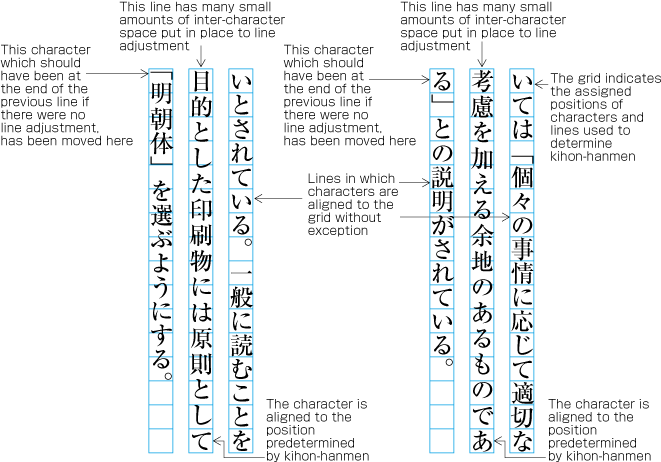
Example of line adjustment to avoid those characters which shall not start and end a line.
Running Heads and Page Numbers
Positioning of Running Heads and Page Numbers
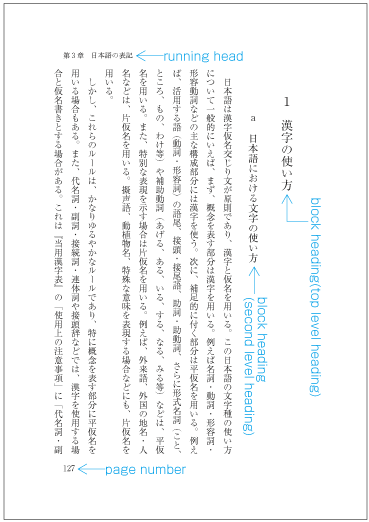
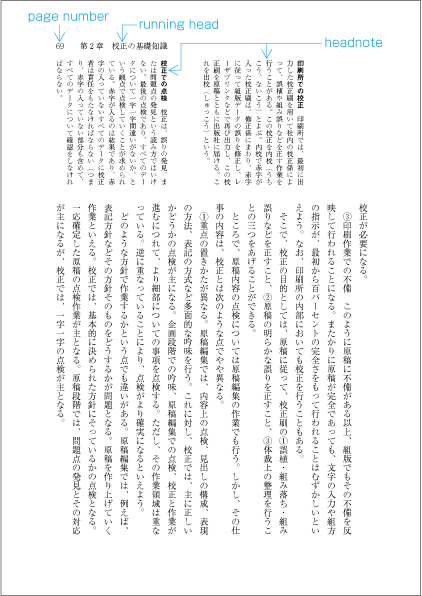
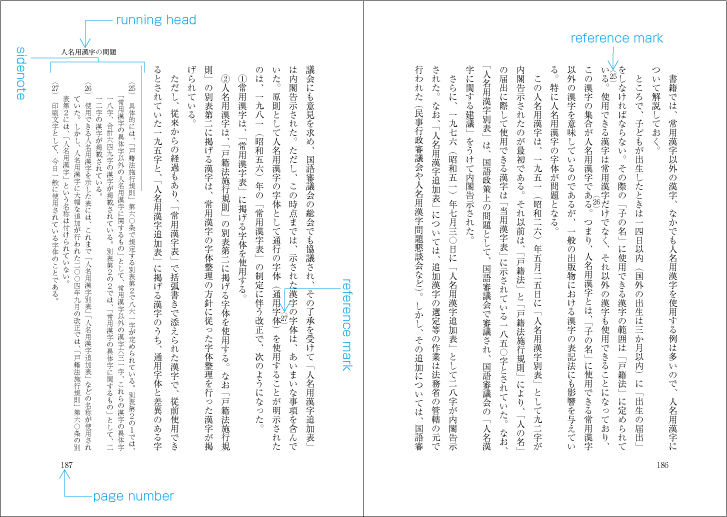
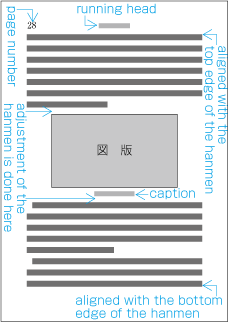
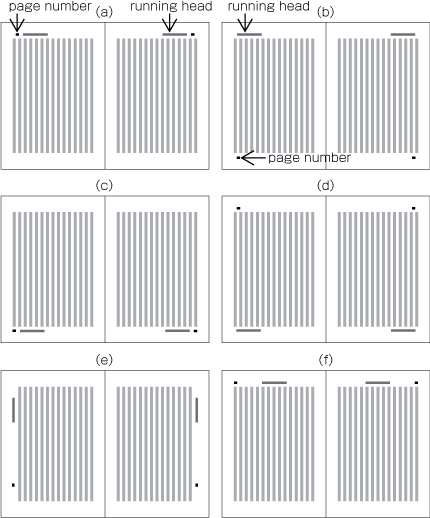
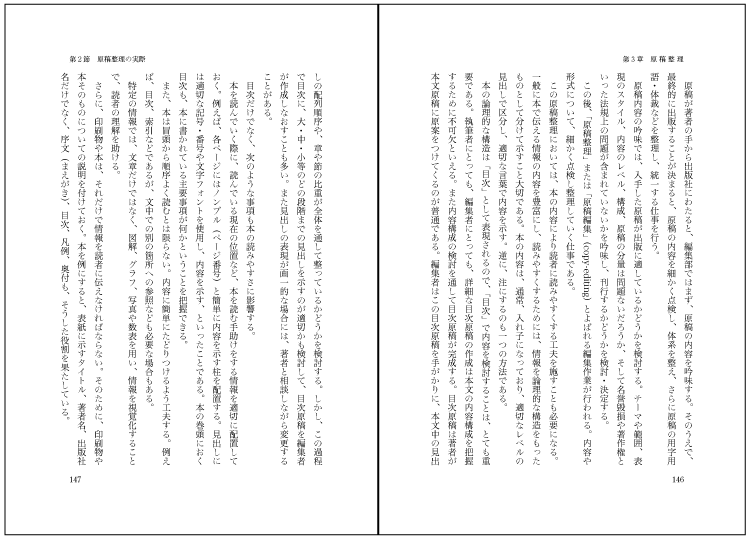
Typical positions of running heads and page numbers for vertically set books with double running heads (see ) are as shown in .
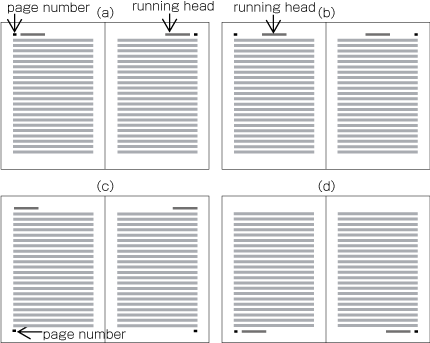
Typical positions of running heads and page numbers for horizontally set books with double running heads (see ) are as shown in .
In principle, positions of running heads and page numbers should be specified relative to the kihon-hanmen, not with absolute coordinates in the trim size. (Positioning of running heads is defined in JIS X 4051, sec. 7.6.4. Positioning of page numbers is defined in JIS X 4051, sec. 7.5.4.)
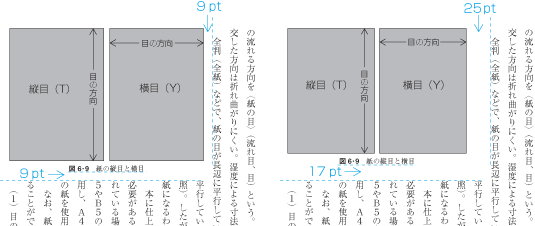
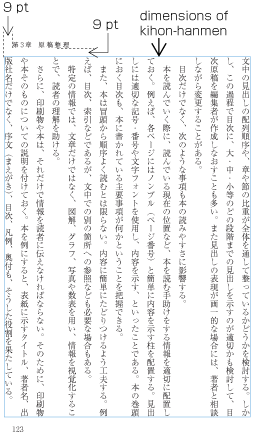
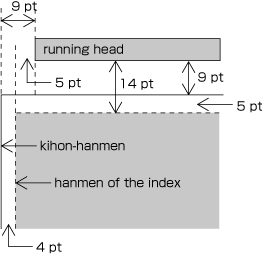
Positioning a horizontal running head above the top left corner (to head and fore-edge) of the kihon-hanmen in a typical vertically set book (see ).
9 points above the kihon-hanmen (vertical space)
9 points from the left edge of the kihon-hanmen (horizontal space)
The following recommendations should be taken into account when positioning running heads and page numbers with reference to the kihon-hanmen.
-
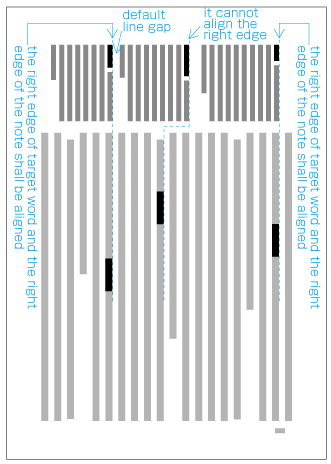
When positioning horizontal running heads and page numbers with reference to the kihon-hanmen in vertically set books, the amount of vertical space between the edge of the kihon-hanmen and the running head is a one em space as established for the kihon-hanmen. If the kihon-hanmen of the book is horizontally set, take more vertical space than the character size in the kihon-hanmen.
-
Regardless of the direction of text in the kihon-hanmen of a book, horizontal running heads and page numbers on the left page should be aligned either at the left edge of the kihon-hanmen or one em space to the right of the left edge. On the right page, the tail of the running heads or page numbers should be aligned either at the right edge of the kihon-hanmen or one full-width space to left of the right edge.
-
Regardless of the direction of text in a book, when arranging running heads and page numbers together on the same horizontal line, the space between the running head and the page number should be double or one and a half times the character size of the running head. On the left page, the page number should be set at the left side and the running head should be set at the right side. On right-hand pages, the page number should be set at the right side and the running head should be set at the left side. The exact positions of the page numbers are given by the instructions above (see b).
-
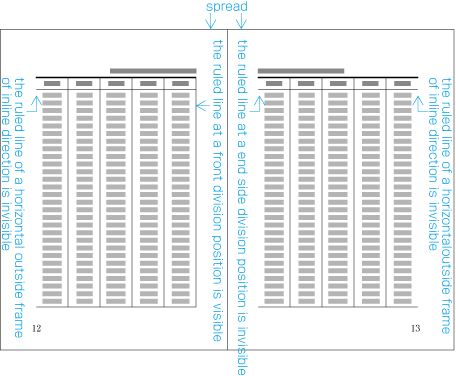
When positioning running heads and page numbers vertically to the fore-edge of the kihon-hanmen in a vertically set book (see spread (e) in , for example), the minimum horizontal distance from the kihon-hanmen should be the same as that of the line gap of the kihon-hanmen. The top of the running head should be positioned approximately four kihon-hanmen characters below the head, and the bottom of the page numbers should be positioned approximately five kihon-hanmen characters above the foot.
Principles of Arrangement of Running Heads and Page Numbers
Positioning of all running heads and page numbers in the same book should be consistent.
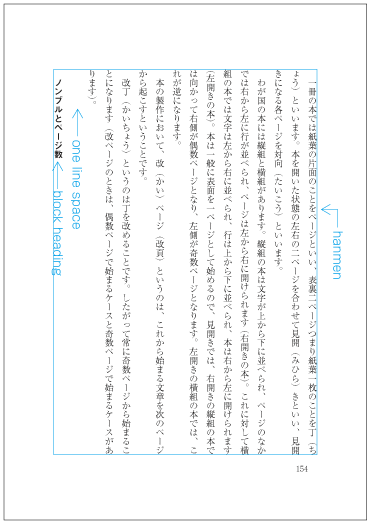
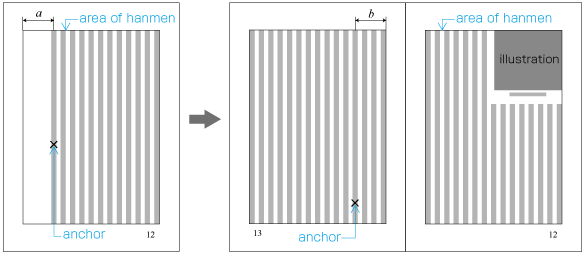
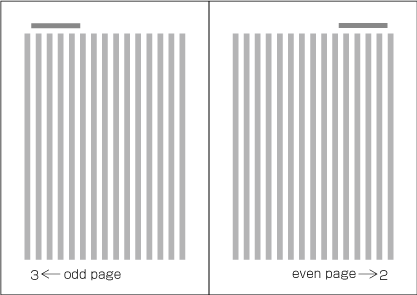
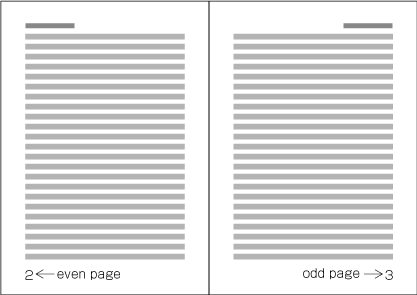
Because the start of a page will be on the recto side, the right-hand page of a spread in a vertically set book is always an even page and the left-hand page is always an odd page (see ). Likewise, the left-hand page of a spread in a horizontally set book is always an even page and the right-hand page is always an odd page (see ).
Ways of Arranging Running Heads and Page Numbers
There are two ways to arrange running heads. One is the single running head method and the other is the double running head method. (Arrangement of running heads is defined in JIS X 4051, sec. 7.6.2. Page Numbers are defined in sec. 7.5.2.).
-
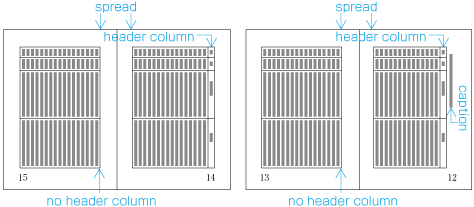
Double running head method: Place running heads on both even pages and odd pages (see ).
-
Single running head method: Place running heads only on odd pages (see ).
-
In the double running head method, a higher-level title, such as that of the chapter or book, is used for the running heads on the even pages, and a lower-level title, such as that for a section, on the odd pages. Where there are no differing levels of titles, such as on the page containing the table of contents, the same running head is used on both even and odd pages.
-
In the single running head method, one of the headings between the top and third levels is used.
-
In principle, the contents of running heads will be the same as those of headings with the following differences:
-
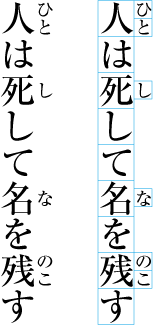
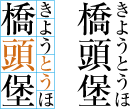
Numbers and words in Latin alphanumeric characters in vertically set headings in vertically set books should be changed to horizontal notation for horizontally set running heads (see ).
-
If headings are too long, they should be made shorter by paraphrasing them in fewer characters. Running heads with too many characters will not look good.
-
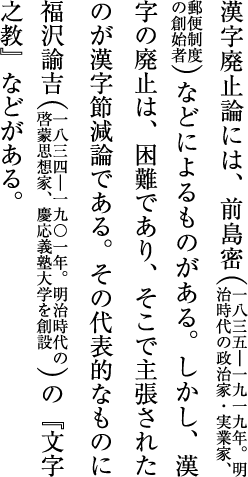
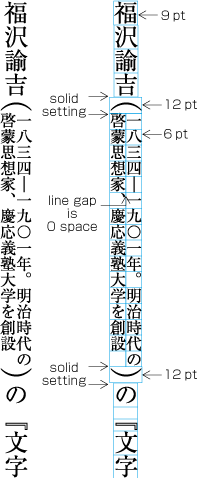
For certain publications, such as a collection of monographs, the names of authors may be added in parentheses at the end of the running head.
-
-
In principle, the text direction of running heads and page numbers should be the same as that of the kihon-hanmen. For vertically set books, however, it is more common to set running heads and page numbers horizontally.
-
In principle, for the single running head method running heads are printed on all odd pages, and for the double running head method on all even and odd pages. However, for the sake of appearance, running heads may be omitted as follows:
-
Pages on which running heads should be hidden:
-
Naka-tobira and han-tobira.
-
Pages where a running head overlaps with other elements such as illustrations.
-
-
Pages on which running heads may be hidden:
-
-
In principle, page numbers are printed on all pages. However, for the sake of appearance, they may be omitted as follows:
-
Pages on which page numbers should be hidden:
-
Pages on which a illustration or a table is positioned adjacent to the page number.
-
-
Pages on which page numbers may be hidden:
-
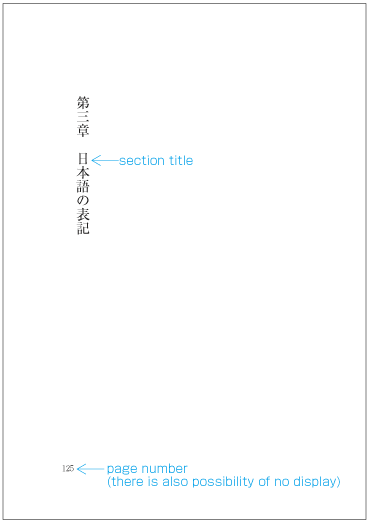
Divisional title and simplified divisional title pages.
-
Pages in horizontally set books with a page number placed in the margin at the top of the page, and with a heading at the beginning of a new recto or new page. (In this case, it is also possible to move the page numbers to the center of the margin at the foot of the page.)
-
-
-
There are two types of page numbering. "Continuous pagination" means that page numbers continue throughout the whole book. "Independent pagination" means that page numbers start from "1" separately at beginning of the front matter and back matter. There is also, for example in manuals, the method of starting each chapter from page number "1". (In such cases, it is common that the name of the chapter is added as a prefix before the page number.)